But what if we want to deploy on AWS? Well, here's the guide to that too.
a) Go to your AWS Management Console and under "Compute" select "EC2".
b) Allocate a new elastic IP
c) Launch a Red Hat Enterprise Linux 6.6 HVM instance
d) When asked about security Groups, just allow all. We'll be using iptables for this purpose, which is more flexible than Amazon's firewall
e) Set up your key pairs
f) Launch
g) Associate your elastic IP with your instance
Let's start with our iptables rules first. My server's IP is 1.2.3.4, my offices' external IP is 2.3.4.5 and my SIP provider's IP is 3.4.5.6. Here I allow SIP, IAX, IAX2 and MGCP connections from my SIP provider. If you're not interested in IAX, IAX2 and MGCP just skip the lines with ports 5036, 4569 and 2727:
[root@ip-1-2-3-4 ~]# iptables -F
[root@ip-1-2-3-4 ~]# iptables -A INPUT -m state --state RELATED,ESTABLISHED -j ACCEPT
[root@ip-1-2-3-4 ~]# iptables -A INPUT -i lo -j ACCEPT
[root@ip-1-2-3-4 ~]# iptables -A 1.2.3.4 -j ACCEPT
[root@ip-1-2-3-4 ~]# iptables -A 2.3.4.5 -j ACCEPT
[root@ip-1-2-3-4 ~]# iptables -A INPUT -s 3.4.5.6 -p tcp -m multiport --dports 5060:5070 -j ACCEPT
[root@ip-1-2-3-4 ~]# iptables -A INPUT -s 3.4.5.6 -p udp -m multiport --dports 5060:5070 -j ACCEPT
[root@ip-1-2-3-4 ~]# iptables -A INPUT -s 3.4.5.6 -p udp -m udp --dport 4569 -j ACCEPT
[root@ip-1-2-3-4 ~]# iptables -A INPUT -s 3.4.5.6 -p udp -m udp --dport 5036 -j ACCEPT
[root@ip-1-2-3-4 ~]# iptables -A INPUT -s 3.4.5.6 -p udp -m udp --dport 2727 -j ACCEPT
[root@ip-1-2-3-4 ~]# iptables -A INPUT -j DROP
[root@ip-1-2-3-4 ~]# iptables -A FORWARD -j DROP
[root@ip-1-2-3-4 ~]# iptables -A OUTPUT -j ACCEPT
[root@ip-1-2-3-4 ~]# iptables-save > /etc/sysconfig/iptables
Let's disable SELinux:
[root@ip-1-2-3-4 ~]# setenforce 0
[root@ip-1-2-3-4 ~]# vi /etc/sysconfig/selinux# This file controls the state of SELinux on the system.
# SELINUX= can take one of these three values:
#     enforcing - SELinux security policy is enforced.
#     permissive - SELinux prints warnings instead of enforcing.
#     disabled - No SELinux policy is loaded.
SELINUX=disabled
# SELINUXTYPE= can take one of these two values:
#     targeted - Targeted processes are protected,
#     mls - Multi Level Security protection.
SELINUXTYPE=targeted
OK, here's a fun fact: I couldn't find newt-devel or audiofile-devel anywhere on a trusted RHEL repo. So, I decided to cheat a bit:
[root@ip-1-2-3-4 ~]#  vi /etc/yum.repos.d/centos.repo[centos]
name=CentOS $releasever - $basearch
baseurl=http://ftp.heanet.ie/pub/centos/6/os/$basearch/
enabled=0
gpgcheck=0
Let's install the EPEL and Remi repos, update our system and install any required dependencies:
[root@ip-1-2-3-4 ~]# wget http://download.fedoraproject.org/pub/epel/6/x86_64/epel-release-6-8.noarch.rpm
[root@ip-1-2-3-4 ~]# rpm -ivh epel-release-6-8.noarch.rpm
[root@ip-1-2-3-4 ~]# rpm --import http://rpms.famillecollet.com/RPM-GPG-KEY-remi
[root@ip-1-2-3-4 ~]# rpm -ivh http://rpms.famillecollet.com/enterprise/remi-release-6.rpm
[root@ip-1-2-3-4 ~]# yum -y update
[root@ip-1-2-3-4 ~]# yum -y groupinstall core
[root@ip-1-2-3-4 ~]# yum -y groupinstall base
[root@ip-1-2-3-4 ~]# yum -y install --enablerepo=epel,remi,centos gcc gcc-c++ lynx bison mysql-devel mysql-server php php-mysql php-pear php-mbstring tftp-server httpd make ncurses-devel libtermcap-devel sendmail sendmail-cf caching-nameserver sox newt newt-devel libxml2-devel libtiff-devel audiofile audiofile-devel sqlite-devel gtk2-devel kernel-devel git subversion php-process crontabs cronie cronie-anacron openssl-devel
[root@ip-1-2-3-4 ~]# yum -y install kernel-headers-`uname -r` kernel-devel-`uname -r` glibc-headers
Autostart MySQL and Apache:
[root@ip-1-2-3-4 ~]# chkconfig --level 345 mysqld on
[root@ip-1-2-3-4 ~]# chkconfig --level 345 httpd on
Time to get moving with the actual Asterisk installation. Here we install PearDB and Google voice dependencies:
[root@ip-1-2-3-4 ~]#pear install db-1.7.14[root@ip-1-2-3-4 ~]#cd /usr/src [root@ip-1-2-3-4 src]# wget https://iksemel.googlecode.com/files/iksemel-1.4.tar.gz [root@ip-1-2-3-4 src]# tar xf iksemel-1.4.tar.gz [root@ip-1-2-3-4 src]# cd iksemel-* [root@ip-1-2-3-4 iksemel-1.4]# ./configure [root@ip-1-2-3-4 iksemel-1.4]# make [root@ip-1-2-3-4 iksemel-1.4]# make install [root@ip-1-2-3-4 iksemel-1.4]# reboot
If you get a No releases available for package "pear.php.net/db" error while trying to reinstall PearDB just do:
[root@ip-1-2-3-4 ~]# pear install db-1.7.14No releases available for package "pear.php.net/db"[root@ip-1-2-3-4 ~]# mkdir /pear
[root@ip-1-2-3-4 pear]# cd /pear/
[root@ip-1-2-3-4 pear]# wget http://download.pear.php.net/package/DB-1.7.14.tgz
[root@ip-1-2-3-4 pear]# pear install DB-1.7.14.tgz
Download and install Asterisk, DAHDI, LIBPRI:
[root@ip-1-2-3-4 ~]#cd /usr/src/ [root@ip-1-2-3-4 src]# wget http://downloads.asterisk.org/pub/telephony/dahdi-linux-complete/dahdi-linux-complete-current.tar.gz [root@ip-1-2-3-4 src]# wget http://downloads.asterisk.org/pub/telephony/libpri/libpri-1.4-current.tar.gz [root@ip-1-2-3-4 src]# wget http://downloads.asterisk.org/pub/telephony/asterisk/asterisk-11-current.tar.gz [root@ip-1-2-3-4 src]# tar xvfz dahdi-linux-complete-current.tar.gz [root@ip-1-2-3-4 src]# cd dahdi-linux-complete-* [root@ip-1-2-3-4 dahdi-linux-complete-2.10.0.1+2.10.0.1]# make all [root@ip-1-2-3-4 dahdi-linux-complete-2.10.0.1+2.10.0.1]# make install [root@ip-1-2-3-4 dahdi-linux-complete-2.10.0.1+2.10.0.1]# make config[root@ip-1-2-3-4 dahdi-linux-complete-2.10.0.1+2.10.0.1]#cd /usr/src[root@ip-1-2-3-4 src]#tar xvfz libpri-1.4-current.tar.gz[root@ip-1-2-3-4 src]#cd libpri-* [root@ip-1-2-3-4 libpri-1.4.15]# make [root@ip-1-2-3-4 libpri-1.4.15]# make install[root@ip-1-2-3-4 libpri-1.4.15]#cd /usr/src [root@ip-1-2-3-4 src]# tar xvfz asterisk-11-current.tar.gz [root@ip-1-2-3-4 src]# cd asterisk-* [root@ip-1-2-3-4 asterisk-11.16.0]# ./configure [root@ip-1-2-3-4 asterisk-11.16.0]# contrib/scripts/get_mp3_source.sh [root@ip-1-2-3-4 asterisk-11.16.0]# make menuselect
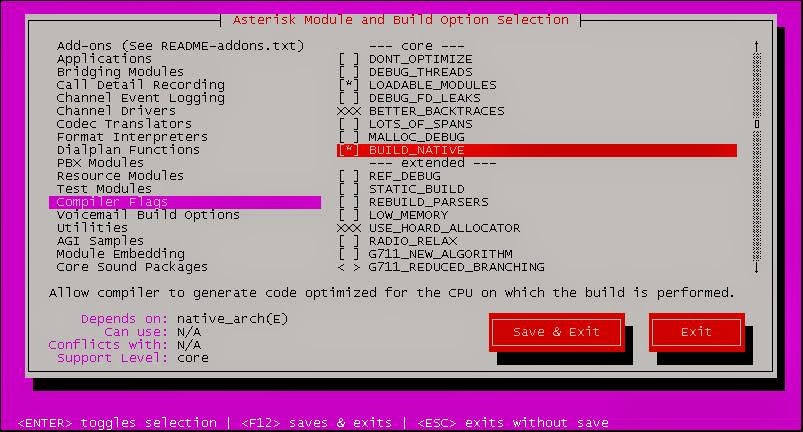
This will bring up a menu. Make sure all the modules, sounds and features you want are included. You at least need to select Resource Modules-> res_xmpp, Channel Drivers -> chan_motif and Compiler Flags -> BUILD_NATIVE


Save and Exit...
[root@ip-1-2-3-4 asterisk-11.16.0]#make[root@ip-1-2-3-4 asterisk-11.16.0]#make installmake config[root@ip-1-2-3-4 asterisk-11.16.0]#cd /var/lib/asterisk/sounds [root@ip-1-2-3-4 sounds]# wget http://downloads.asterisk.org/pub/telephony/sounds/asterisk-extra-sounds-en-gsm-current.tar.gz [root@ip-1-2-3-4 sounds]# tar xfz asterisk-extra-sounds-en-gsm-current.tar.gz [root@ip-1-2-3-4 sounds]# rm asterisk-extra-sounds-en-gsm-current.tar.gz[root@ip-1-2-3-4 asterisk-11.16.0]#
That's it! Asterisk is now fully installed! Time to install FreePBX:
[root@ip-1-2-3-4 sounds]#cd /usr/src [root@ip-1-2-3-4 src]# export VER_FREEPBX=2.11[root@ip-1-2-3-4 src]#git clone http://git.freepbx.org/scm/freepbx/framework.git freepbx[root@ip-1-2-3-4 src]#cd freepbx/ [root@ip-1-2-3-4 freepbx]# git checkout release/${VER_FREEPBX} [root@ip-1-2-3-4 freepbx]# adduser asterisk -M -c "Asterisk User" [root@ip-1-2-3-4 freepbx]# chown asterisk. /var/run/asterisk [root@ip-1-2-3-4 freepbx]# chown -R asterisk. /etc/asterisk [root@ip-1-2-3-4 freepbx]# chown -R asterisk. /var/{lib,log,spool}/asterisk [root@ip-1-2-3-4 freepbx]# chown -R asterisk. /usr/lib/asterisk [root@ip-1-2-3-4 freepbx]# mkdir /var/www/html [root@ip-1-2-3-4 freepbx]# chown -R asterisk. /var/www/
Change PHP upload_max_filesize to 120MB and change the default Apache User and Group:
[root@ip-1-2-3-4 freepbx]# chown -R asterisk. /var/www/
[root@ip-1-2-3-4 freepbx]# sed -i 's/\(^upload_max_filesize = \).*/\120M/' /etc/php.ini
[root@ip-1-2-3-4 freepbx]# cp /etc/httpd/conf/httpd.conf /etc/httpd/conf/httpd.conf_orig
[root@ip-1-2-3-4 freepbx]# sed -i 's/^\(User\|Group\).*/\1 asterisk/' /etc/httpd/conf/httpd.conf
[root@ip-1-2-3-4 freepbx]# sed -i 's/^DocumentRoot.*/DocumentRoot \"\/var\/www\/admin\"/g' /etc/httpd/conf/httpd.conf
[root@ip-1-2-3-4 freepbx]# service httpd restart
Configure MySQL database:
[root@ip-1-2-3-4 freepbx]# mysql_secure_installation
[root@ip-1-2-3-4 freepbx]# export ASTERISK_DB_PW=amp109
[root@ip-1-2-3-4 freepbx]# mysqladmin -u root create asterisk -p
[root@ip-1-2-3-4 freepbx]# mysqladmin -u root create asteriskcdrdb -p
[root@ip-1-2-3-4 freepbx]# mysql -u root asterisk -p < SQL/newinstall.sql
[root@ip-1-2-3-4 freepbx]# mysql -u root asteriskcdrdb -p < SQL/cdr_mysql_table.sql
[root@ip-1-2-3-4 freepbx]# mysql -u root -p -e "GRANT ALL PRIVILEGES ON asterisk.* TO asteriskuser@localhost IDENTIFIED BY '${ASTERISK_DB_PW}';"
[root@ip-1-2-3-4 freepbx]# mysql -u root -p -e "GRANT ALL PRIVILEGES ON asteriskcdrdb.* TO asteriskuser@localhost IDENTIFIED BY '${ASTERISK_DB_PW}';"
[root@ip-1-2-3-4 freepbx]# mysql -u root -p -e "flush privileges;"
Time to start it all up:
[root@ip-1-2-3-4 freepbx]# ln -s /usr/lib/libasteriskssl.so.1 /usr/lib64/libasteriskssl.so.1
[root@ip-1-2-3-4 freepbx]# ./start_asterisk start
[root@ip-1-2-3-4 freepbx]# ./install_amp --username=asteriskuser --password=$ASTERISK_DB_PW --webroot /var/www
[root@ip-1-2-3-4 freepbx]# amportal a ma download manager
[root@ip-1-2-3-4 freepbx]# amportal a ma install manager
[root@ip-1-2-3-4 freepbx]# amportal a ma installall
[root@ip-1-2-3-4 freepbx]# amportal a reload
This should give you a few questions to answer, but accepting the default values is more than recommended EXCEPT the "Enter the IP ADDRESS or hostname used to access the AMP web-admin". Obviously you should enter your server's IP address there. In my case that would be 1.2.3.4.
Almost there:
[root@ip-1-2-3-4 freepbx]# ln -s /var/lib/asterisk/moh /var/lib/asterisk/mohmp3
[root@ip-1-2-3-4 freepbx]# amportal start
After you enable and update the modules in FreePBX, you might see the following error: Symlink from modules failed
To correct this error just delete the list of failed files:
[root@ip-1-2-3-4 freepbx]# cd /etc/asterisk
[root@ip-1-2-3-4 freepbx]# rm ccss.conf confbridge.conf features.conf sip.conf iax.conf logger.conf extensions.conf sip_notify.conf
References: http://wiki.freepbx.org/display/HTGS/Installing+FreePBX+2.11+on+Centos+6.3
No comments:
Post a Comment