Showing posts with label asterisk. Show all posts

Friday, March 6, 2015

Create your own Cloud PBX with Asterisk and FreePBX Part 3

We can now go to our web browser and type the IP of our system to manage our FreePBX. The first thing we'll be required to do is set up the admin account. After that, we can just go to "FreePBX Administration" and begin setting things up.


I guess that's expected when you use a t2.micro instance
We can go right ahead and upgrade, this interface makes the whole process too easy.


And after it's finished, if we check again:


After it's done, we want to "Apply Config", then more modules will become available, so feel free to update everything, applying the config and checking again until there's nothing more to upgrade.

root@localhost:/usr/src/freepbx# amportal a ma refreshsignatures

After you enable and update the modules in FreePBX, you might see the following error: Symlink from modules failed

To correct this error just delete the list of failed files:

root@localhost:/usr/src/freepbx# cd /etc/asterisk
root@localhost:/etc/asterisk# rm ccss.conf confbridge.conf features.conf sip.conf iax.conf logger.conf extensions.conf sip_notify.conf

Then on the FreePBX webUI go to the ‘Module Admin’ and uninstall and reinstall the ‘Camp On’ module. This should resolve the Symlink issue.

Before we move any further, I'd like to recommend something: Head on over to Digium and buy their g729 codec. It's amazing. I am in no way affiliated with Digium but please consider this. Not just because of the fact that Asterisk is a great product and you should support its development team; g729 is really, really worth every cent of its cost.

These are the steps required to install the g729 codec.

We need to know our Asterisk version and our platform before we install it:

root@localhost:~# asterisk -V
Asterisk 11.16.0
root@localhost:~# uname -a
Linux localhost 3.2.0-77-virtual #112-Ubuntu SMP Tue Feb 10 15:34:22 UTC 2015 x86_64 x86_64 x86_64 GNU/Linux

Right, so we're running Asterisk 11.16.0 on a 64-bit system.

root@localhost:~# mkdir g729_codec
root@localhost:~# cd g729_codec/

After we've received the license key in our mailbox, we need to go to http://downloads.digium.com/pub/register and find which version of the file we need to download.

root@localhost:~/g729_codec# wget http://downloads.digium.com/pub/register/linux/register
root@localhost:~/g729_codec# chmod 700 register 
root@localhost:~/g729_codec# ./register

We now have to go to http://downloads.digium.com/pub/telephony/codec_g729/benchg729 and find which version of the file we need to download.

root@localhost:~/g729_codec# wget http://downloads.digium.com/pub/telephony/codec_g729/benchg729/x86-64/benchg729-1.0.8-x86_64
root@localhost:~/g729_codec# chmod 700 benchg729-1.0.8-x86_64
root@localhost:~/g729_codec# ./benchg729-1.0.8-x86_64 
Results:
Average for flavor 'generic' is 238 milliseconds of CPU time.
Average for flavor 'nocona' is 241 milliseconds of CPU time.
Average for flavor 'core2' is 237 milliseconds of CPU time.
Average for flavor 'opteron' is 440 milliseconds of CPU time.
Average for flavor 'opteron-sse3' is 438 milliseconds of CPU time.
Average for flavor 'barcelona' is 237 milliseconds of CPU time.

Recommended flavor for this system is 'core2' with an average of 237 milliseconds of CPU time.

So the recommended flavor for my Linode is 'core2'. Now go to http://my.digium.com/en/docs/G729/g729-download/ and select your platform and the recommended flavor, which in my case is core2.

root@localhost:~/g729_codec# wget http://downloads.digium.com/pub/telephony/codec_g729/asterisk-11.0/x86-64/codec_g729a-11.0_3.1.7-core2_64.tar.gz
root@localhost:~/g729_codec# tar zxvf codec*
root@localhost:~/g729_codec# cd codec*
root@localhost:~/g729_codec/codec_g729a-11.0_3.1.7-core2_64# cp codec*.so /usr/lib/asterisk/modules
root@localhost:~/g729_codec/codec_g729a-11.0_3.1.7-core2_64# amportal restart

That's it!

root@localhost:~/g729_codec# root@localhost:~# asterisk -rvvvv
Asterisk 11.16.0, Copyright (C) 1999 - 2013 Digium, Inc. and others.
Created by Mark Spencer 
Asterisk comes with ABSOLUTELY NO WARRANTY; type 'core show warranty' for details.
This is free software, with components licensed under the GNU General Public
License version 2 and other licenses; you are welcome to redistribute it under
certain conditions. Type 'core show license' for details.
=========================================================================
Connected to Asterisk 11.16.0 currently running on localhost (pid = 839)
localhost*CLI> core show translation
         Translation times between formats (in microseconds) for one second of data
          Source Format (Rows) Destination Format (Columns)

            gsm  ulaw  alaw  g726 adpcm  slin lpc10  g729  ilbc g726aal2  g722 slin16 testlaw slin12 slin24 slin32 slin44 slin48 slin96 slin192
      gsm     - 15000 15000 15000 15000  9000 15000 15000 15000    15000 17250  17000   15000  17000  17000  17000  17000  17000  17000   17000
     ulaw 15000     -  9150 15000 15000  9000 15000 15000 15000    15000 17250  17000   15000  17000  17000  17000  17000  17000  17000   17000
     alaw 15000  9150     - 15000 15000  9000 15000 15000 15000    15000 17250  17000   15000  17000  17000  17000  17000  17000  17000   17000
     g726 15000 15000 15000     - 15000  9000 15000 15000 15000    15000 17250  17000   15000  17000  17000  17000  17000  17000  17000   17000
    adpcm 15000 15000 15000 15000     -  9000 15000 15000 15000    15000 17250  17000   15000  17000  17000  17000  17000  17000  17000   17000
     slin  6000  6000  6000  6000  6000     -  6000  6000  6000     6000  8250   8000    6000   8000   8000   8000   8000   8000   8000    8000
    lpc10 15000 15000 15000 15000 15000  9000     - 15000 15000    15000 17250  17000   15000  17000  17000  17000  17000  17000  17000   17000
     g729 15000 15000 15000 15000 15000  9000 15000     - 15000    15000 17250  17000   15000  17000  17000  17000  17000  17000  17000   17000
     ilbc 15000 15000 15000 15000 15000  9000 15000 15000     -    15000 17250  17000   15000  17000  17000  17000  17000  17000  17000   17000
 g726aal2 15000 15000 15000 15000 15000  9000 15000 15000 15000        - 17250  17000   15000  17000  17000  17000  17000  17000  17000   17000
     g722 15600 15600 15600 15600 15600  9600 15600 15600 15600    15600     -   9000   15600  17500  17000  17000  17000  17000  17000   17000
   slin16 14500 14500 14500 14500 14500  8500 14500 14500 14500    14500  6000      -   14500   8500   8000   8000   8000   8000   8000    8000
  testlaw 15000 15000 15000 15000 15000  9000 15000 15000 15000    15000 17250  17000       -  17000  17000  17000  17000  17000  17000   17000
   slin12 14500 14500 14500 14500 14500  8500 14500 14500 14500    14500 14000   8000   14500      -   8000   8000   8000   8000   8000    8000
   slin24 14500 14500 14500 14500 14500  8500 14500 14500 14500    14500 14500   8500   14500   8500      -   8000   8000   8000   8000    8000
   slin32 14500 14500 14500 14500 14500  8500 14500 14500 14500    14500 14500   8500   14500   8500   8500      -   8000   8000   8000    8000
   slin44 14500 14500 14500 14500 14500  8500 14500 14500 14500    14500 14500   8500   14500   8500   8500   8500      -   8000   8000    8000
   slin48 14500 14500 14500 14500 14500  8500 14500 14500 14500    14500 14500   8500   14500   8500   8500   8500   8500      -   8000    8000
   slin96 14500 14500 14500 14500 14500  8500 14500 14500 14500    14500 14500   8500   14500   8500   8500   8500   8500   8500      -    8000
  slin192 14500 14500 14500 14500 14500  8500 14500 14500 14500    14500 14500   8500   14500   8500   8500   8500   8500   8500   8500       -


Don't forget to reboot after all this is done.

OK, let's begin setting up our FreePBX:

Go to Settings -> Asterisk SIP settings.


What we want to do there is Disallow Anonymous Inbound SIP Calls, enter our IP and our network, define a STUN server (although not really required since this is a public IP), and check the codecs we're planning on using. There's no reason to use codecs our SIP provider doesn't.


Submit and Apply.

Now let's go to Applications -> Extensions. There we select "Generic CHAN SIP device" from the drop-down menu and click on submit.


This one's real easy. We only need to specify the extension number and maybe the Display name. Everything can be left to defaults, except maybe the "secret" under "Device Options", which will be the password your VoIP phone or softphone will need to give to your server, so you might want to change it to something more memorable. Or maybe not.


Submit and Apply Config and repeat the process for as many extensions you want.

Next, we'll create an IVR. We need this so that when someone dials our number, Asterisk will know that it needs to wait for the caller to enter the extension. Ideally we'd have a recording of a person saying "Please enter an extension" or the like, but many companies just leave this without one

So go to Applications -> IVR and select "Add a new IVR". Select a name and a description for it and make sure that "Direct Dial" points to "Extensions". Make a few more choices about what Asterisk should do in the case of an invalid destination or a timeout and finally add all the extensions you added before on the bottom of the page, making sure that "Extensions" is selected under "Destination".


Submit and Apply Config.

Time to create our trunk. Go to Connectivity -> Trunks and select "Add SIP (chan_sip) Trunk".

For a trunk name, I usually select my SIP provider's name. Enter your DID number in the "Outbound CallerID" and select "Force Trunk CID" under CID options.

In Outgoing Settings, Trunk Name just put the same thing you put under General Settings. In the PEER Details box, you should put the settings provided by your VoIP provider. If you weren't provided with any, you could just ask them or google for them.


If your VoIP provider provided you with user (not peer!) connection parameters, this is what you need to enter in USER context and USER Details. Otherwise delete everything from there and leave them blank.


If you left USER context and USER Details blank, then you will need to enter a REGISTER string. That will be in the form of:


username:secret@VoIP_Provider_host/DID

Submit and Apply Config.

Now, on to creating an Inbound route. Go to Connectivity -> Inbound Routes. Here, any Description will do. Just make sure your DID number is in the "DID number" field, and on the bottom of the page under "Set Destination" select IVR and your recently created ivr name (mine was ivr1). You might also want to check Signal RINGING and put 1 in the "Pause Before Answer" field.

Submit and Apply Config.

Finally, let's set up our outbound route. Go to Connectivity -> Outbound Routes. Just put anything in the "Description" field and make sure you put your DID number in the Route CID field. Make sure you enter a dial pattern for this. 

Some examples to get you started can be found here, but you can get away with just entering a dot (literally the character .) in the "match pattern" field. That means that it will route everything. Finally, choose the trunk you created earlier under "Trunk Sequence For Matched Routes".


Submit and Apply Config.

Some VoIP providers require you to have actually activated your DID, or allowed your account to make calls, etc. If you've gone through the process and you're sure there's nothing else to do on that end, you're set. All that remains is for you to get a softphone or a VoIP phone, set it up and start doing calls over IP.


Note that you might need to dial using an international prefix!

Create your own Cloud PBX with Asterisk and FreePBX Part 2


But what if we want to deploy on AWS? Well, here's the guide to that too.

a) Go to your AWS Management Console and under "Compute" select "EC2".
b) Allocate a new elastic IP
c) Launch a Red Hat Enterprise Linux 6.6 HVM instance
d) When asked about security Groups, just allow all. We'll be using iptables for this purpose, which is more flexible than Amazon's firewall
e) Set up your key pairs
f) Launch
g) Associate your elastic IP with your instance
h) SSH to your server using the key pair and username ec2-user

Let's start with our iptables rules first. My server's IP is 1.2.3.4, my offices' external IP is 2.3.4.5 and my SIP provider's IP is 3.4.5.6. Here I allow SIP, IAX, IAX2 and MGCP connections from my SIP provider. If you're not interested in IAX, IAX2 and MGCP just skip the lines with ports 5036, 4569 and 2727:

[root@ip-1-2-3-4 ~]# iptables -F
[root@ip-1-2-3-4 ~]# iptables -A INPUT -m state --state RELATED,ESTABLISHED -j ACCEPT
[root@ip-1-2-3-4 ~]# iptables -A INPUT -i lo -j ACCEPT
[root@ip-1-2-3-4 ~]# iptables -A 1.2.3.4 -j ACCEPT
[root@ip-1-2-3-4 ~]# iptables -A 2.3.4.5 -j ACCEPT
[root@ip-1-2-3-4 ~]# iptables -A INPUT -s 3.4.5.6 -p tcp -m multiport --dports 5060:5070 -j ACCEPT
[root@ip-1-2-3-4 ~]# iptables -A INPUT -s 3.4.5.6 -p udp -m multiport --dports 5060:5070 -j ACCEPT
[root@ip-1-2-3-4 ~]# iptables -A INPUT -s 3.4.5.6 -p udp -m udp --dport 4569 -j ACCEPT
[root@ip-1-2-3-4 ~]# iptables -A INPUT -s 3.4.5.6 -p udp -m udp --dport 5036 -j ACCEPT
[root@ip-1-2-3-4 ~]# iptables -A INPUT -s 3.4.5.6 -p udp -m udp --dport 2727 -j ACCEPT
[root@ip-1-2-3-4 ~]# iptables -A INPUT -j DROP
[root@ip-1-2-3-4 ~]# iptables -A FORWARD -j DROP
[root@ip-1-2-3-4 ~]# iptables -A OUTPUT -j ACCEPT
[root@ip-1-2-3-4 ~]# iptables-save > /etc/sysconfig/iptables

Let's disable SELinux:

[root@ip-1-2-3-4 ~]# setenforce 0
[root@ip-1-2-3-4 ~]# vi /etc/sysconfig/selinux
# This file controls the state of SELinux on the system.
# SELINUX= can take one of these three values:
#     enforcing - SELinux security policy is enforced.
#     permissive - SELinux prints warnings instead of enforcing.
#     disabled - No SELinux policy is loaded.
SELINUX=disabled
# SELINUXTYPE= can take one of these two values:
#     targeted - Targeted processes are protected,
#     mls - Multi Level Security protection.
SELINUXTYPE=targeted


OK, here's a fun fact: I couldn't find newt-devel or audiofile-devel anywhere on a trusted RHEL repo. So, I decided to cheat a bit:

[root@ip-1-2-3-4 ~]#  vi /etc/yum.repos.d/centos.repo
[centos]
name=CentOS $releasever - $basearch
baseurl=http://ftp.heanet.ie/pub/centos/6/os/$basearch/
enabled=0
gpgcheck=0

Let's install the EPEL and Remi repos, update our system and install any required dependencies:

[root@ip-1-2-3-4 ~]# wget http://download.fedoraproject.org/pub/epel/6/x86_64/epel-release-6-8.noarch.rpm
[root@ip-1-2-3-4 ~]# rpm -ivh epel-release-6-8.noarch.rpm
[root@ip-1-2-3-4 ~]# rpm --import http://rpms.famillecollet.com/RPM-GPG-KEY-remi
[root@ip-1-2-3-4 ~]# rpm -ivh http://rpms.famillecollet.com/enterprise/remi-release-6.rpm
[root@ip-1-2-3-4 ~]# yum -y update
[root@ip-1-2-3-4 ~]# yum -y groupinstall core
[root@ip-1-2-3-4 ~]# yum -y groupinstall base
[root@ip-1-2-3-4 ~]# yum -y install --enablerepo=epel,remi,centos gcc gcc-c++ lynx bison mysql-devel mysql-server php php-mysql php-pear php-mbstring tftp-server httpd make ncurses-devel libtermcap-devel sendmail sendmail-cf caching-nameserver sox newt newt-devel libxml2-devel libtiff-devel audiofile audiofile-devel sqlite-devel gtk2-devel kernel-devel git subversion php-process crontabs cronie cronie-anacron openssl-devel
[root@ip-1-2-3-4 ~]# yum -y install kernel-headers-`uname -r` kernel-devel-`uname -r` glibc-headers

Autostart MySQL and Apache:

[root@ip-1-2-3-4 ~]# chkconfig --level 345 mysqld on
[root@ip-1-2-3-4 ~]# chkconfig --level 345 httpd on

Time to get moving with the actual Asterisk installation. Here we install PearDB and Google voice dependencies:

[root@ip-1-2-3-4 ~]# pear install db-1.7.14
[root@ip-1-2-3-4 ~]# cd /usr/src
[root@ip-1-2-3-4 src]# wget https://iksemel.googlecode.com/files/iksemel-1.4.tar.gz
[root@ip-1-2-3-4 src]# tar xf iksemel-1.4.tar.gz
[root@ip-1-2-3-4 src]# cd iksemel-*
[root@ip-1-2-3-4 iksemel-1.4]# ./configure
[root@ip-1-2-3-4 iksemel-1.4]# make
[root@ip-1-2-3-4 iksemel-1.4]# make install
[root@ip-1-2-3-4 iksemel-1.4]# reboot

If you get a No releases available for package "pear.php.net/db" error while trying to reinstall PearDB just do:

[root@ip-1-2-3-4 ~]# pear install db-1.7.14
No releases available for package "pear.php.net/db"
[root@ip-1-2-3-4 ~]# mkdir /pear
[root@ip-1-2-3-4 pear]# cd /pear/
[root@ip-1-2-3-4 pear]# wget http://download.pear.php.net/package/DB-1.7.14.tgz
[root@ip-1-2-3-4 pear]# pear install DB-1.7.14.tgz

Download and install Asterisk, DAHDI, LIBPRI:

[root@ip-1-2-3-4 ~]# cd /usr/src/
[root@ip-1-2-3-4 src]# wget http://downloads.asterisk.org/pub/telephony/dahdi-linux-complete/dahdi-linux-complete-current.tar.gz
[root@ip-1-2-3-4 src]# wget http://downloads.asterisk.org/pub/telephony/libpri/libpri-1.4-current.tar.gz
[root@ip-1-2-3-4 src]# wget http://downloads.asterisk.org/pub/telephony/asterisk/asterisk-11-current.tar.gz
[root@ip-1-2-3-4 src]# tar xvfz dahdi-linux-complete-current.tar.gz
[root@ip-1-2-3-4 src]# cd dahdi-linux-complete-*
[root@ip-1-2-3-4 dahdi-linux-complete-2.10.0.1+2.10.0.1]# make all
[root@ip-1-2-3-4 dahdi-linux-complete-2.10.0.1+2.10.0.1]# make install
[root@ip-1-2-3-4 dahdi-linux-complete-2.10.0.1+2.10.0.1]# make config
[root@ip-1-2-3-4 dahdi-linux-complete-2.10.0.1+2.10.0.1]# cd /usr/src
[root@ip-1-2-3-4 src]# tar xvfz libpri-1.4-current.tar.gz
[root@ip-1-2-3-4 src]# cd libpri-*
[root@ip-1-2-3-4 libpri-1.4.15]# make
[root@ip-1-2-3-4 libpri-1.4.15]# make install
[root@ip-1-2-3-4 libpri-1.4.15]# cd /usr/src
[root@ip-1-2-3-4 src]# tar xvfz asterisk-11-current.tar.gz
[root@ip-1-2-3-4 src]# cd asterisk-*
[root@ip-1-2-3-4 asterisk-11.16.0]# ./configure
[root@ip-1-2-3-4 asterisk-11.16.0]# contrib/scripts/get_mp3_source.sh
[root@ip-1-2-3-4 asterisk-11.16.0]# make menuselect

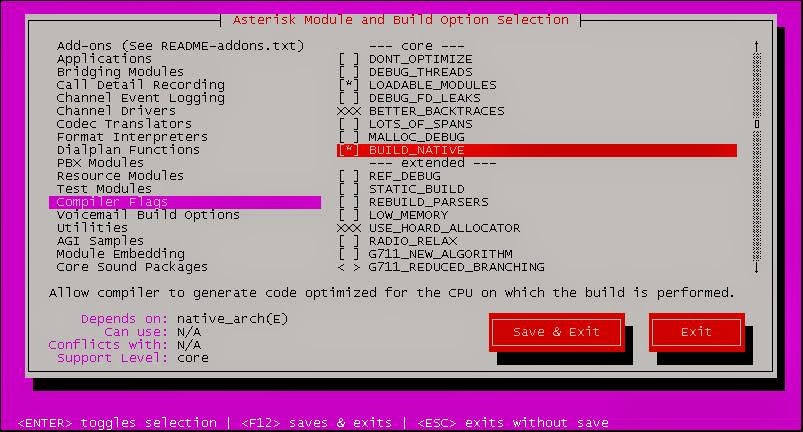
This will bring up a menu. Make sure all the modules, sounds and features you want are included. You at least need to select Resource Modules-> res_xmpp, Channel Drivers -> chan_motif and Compiler Flags -> BUILD_NATIVE


Save and Exit...

[root@ip-1-2-3-4 asterisk-11.16.0]# make
[root@ip-1-2-3-4 asterisk-11.16.0]# make install
[root@ip-1-2-3-4 asterisk-11.16.0]# make config
[root@ip-1-2-3-4 asterisk-11.16.0]# cd /var/lib/asterisk/sounds
[root@ip-1-2-3-4 sounds]# wget http://downloads.asterisk.org/pub/telephony/sounds/asterisk-extra-sounds-en-gsm-current.tar.gz
[root@ip-1-2-3-4 sounds]# tar xfz asterisk-extra-sounds-en-gsm-current.tar.gz
[root@ip-1-2-3-4 sounds]# rm asterisk-extra-sounds-en-gsm-current.tar.gz

That's it! Asterisk is now fully installed! Time to install FreePBX:

[root@ip-1-2-3-4 sounds]# cd /usr/src
[root@ip-1-2-3-4 src]# export VER_FREEPBX=2.11
[root@ip-1-2-3-4 src]# git clone http://git.freepbx.org/scm/freepbx/framework.git freepbx
[root@ip-1-2-3-4 src]# cd freepbx/
[root@ip-1-2-3-4 freepbx]# git checkout release/${VER_FREEPBX}
[root@ip-1-2-3-4 freepbx]# adduser asterisk -M -c "Asterisk User"
[root@ip-1-2-3-4 freepbx]# chown asterisk. /var/run/asterisk
[root@ip-1-2-3-4 freepbx]# chown -R asterisk. /etc/asterisk
[root@ip-1-2-3-4 freepbx]# chown -R asterisk. /var/{lib,log,spool}/asterisk
[root@ip-1-2-3-4 freepbx]# chown -R asterisk. /usr/lib/asterisk
[root@ip-1-2-3-4 freepbx]# mkdir /var/www/html
[root@ip-1-2-3-4 freepbx]# chown -R asterisk. /var/www/

Change PHP upload_max_filesize to 120MB and change the default Apache User and Group:

[root@ip-1-2-3-4 freepbx]# chown -R asterisk. /var/www/
[root@ip-1-2-3-4 freepbx]# sed -i 's/\(^upload_max_filesize = \).*/\120M/' /etc/php.ini
[root@ip-1-2-3-4 freepbx]# cp /etc/httpd/conf/httpd.conf /etc/httpd/conf/httpd.conf_orig
[root@ip-1-2-3-4 freepbx]# sed -i 's/^\(User\|Group\).*/\1 asterisk/' /etc/httpd/conf/httpd.conf
[root@ip-1-2-3-4 freepbx]# sed -i 's/^DocumentRoot.*/DocumentRoot \"\/var\/www\/admin\"/g' /etc/httpd/conf/httpd.conf
[root@ip-1-2-3-4 freepbx]# service httpd restart

Configure MySQL database:

[root@ip-1-2-3-4 freepbx]# mysql_secure_installation
[root@ip-1-2-3-4 freepbx]# export ASTERISK_DB_PW=amp109
[root@ip-1-2-3-4 freepbx]# mysqladmin -u root create asterisk -p
[root@ip-1-2-3-4 freepbx]# mysqladmin -u root create asteriskcdrdb -p
[root@ip-1-2-3-4 freepbx]# mysql -u root asterisk -p < SQL/newinstall.sql 
[root@ip-1-2-3-4 freepbx]# mysql -u root asteriskcdrdb -p < SQL/cdr_mysql_table.sql 
[root@ip-1-2-3-4 freepbx]# mysql -u root -p -e "GRANT ALL PRIVILEGES ON asterisk.* TO asteriskuser@localhost IDENTIFIED BY '${ASTERISK_DB_PW}';"
[root@ip-1-2-3-4 freepbx]# mysql -u root -p -e "GRANT ALL PRIVILEGES ON asteriskcdrdb.* TO asteriskuser@localhost IDENTIFIED BY '${ASTERISK_DB_PW}';"
[root@ip-1-2-3-4 freepbx]# mysql -u root -p -e "flush privileges;"

Time to start it all up:

[root@ip-1-2-3-4 freepbx]# ln -s /usr/lib/libasteriskssl.so.1 /usr/lib64/libasteriskssl.so.1
[root@ip-1-2-3-4 freepbx]# ./start_asterisk start
[root@ip-1-2-3-4 freepbx]# ./install_amp --username=asteriskuser --password=$ASTERISK_DB_PW --webroot /var/www
[root@ip-1-2-3-4 freepbx]# amportal a ma download manager
[root@ip-1-2-3-4 freepbx]# amportal a ma install manager
[root@ip-1-2-3-4 freepbx]# amportal a ma installall
[root@ip-1-2-3-4 freepbx]# amportal a reload

This should give you a few questions to answer, but accepting the default values is more than recommended EXCEPT the "Enter the IP ADDRESS or hostname used to access the AMP web-admin". Obviously you should enter your server's IP address there. In my case that would be 1.2.3.4.

Almost there:

[root@ip-1-2-3-4 freepbx]# ln -s /var/lib/asterisk/moh /var/lib/asterisk/mohmp3
[root@ip-1-2-3-4 freepbx]# amportal start


After you enable and update the modules in FreePBX, you might see the following error: Symlink from modules failed

To correct this error just delete the list of failed files:

[root@ip-1-2-3-4 freepbx]# cd /etc/asterisk
[root@ip-1-2-3-4 freepbx]# rm ccss.conf confbridge.conf features.conf sip.conf iax.conf logger.conf extensions.conf sip_notify.conf

References: http://wiki.freepbx.org/display/HTGS/Installing+FreePBX+2.11+on+Centos+6.3

Thursday, March 5, 2015

Create your own Cloud PBX with Asterisk and FreePBX Part 1

Cloud PBXes are amazing. Is your internet down? Move your laptop/tablet/smartphone to the nearest publicly available WiFi spot and you can still catch that important call or conference using a softphone without anyone knowing. Couldn't make it in time to the office? Same. Ill and stayed at home? Use a softphone from your own network. Costs? Unbelievably low; any savings from running your own PBX server instead will start to show after years.

Well, let's create our own cloud PBX then.

Honestly, if you want to set up your own cloud PBX, you can't do any better than getting Ward Mundy's AMIs (here's a link to them) and just anwering a few questions his automated script will ask. Easy and secure.

But, what if we want to create our own? Start from the very beginning? Or maybe we don't want all the bells and whistles Ward Mundy provides us? Or perhaps we want to deploy on a different platform than Amazon? Or maybe CentOS just isn't our cup of tea?

Let's start deploying on Linode then.

I'm going to use Ubuntu 12.0.4 LTS for this.

First of all, we'll need configure our server with a static IP. For this example's sake my server will use 1.2.3.4.

root@localhost:~# vi /etc/network/interfaces
# This file describes the network interfaces available on your system
# and how to activate them. For more information, see interfaces(5).

# The loopback network interface
auto lo
iface lo inet loopback

# The primary network interface
auto eth0
#iface eth0 inet dhcp
iface eth0 inet static
        address 1.2.3.4/24
        gateway 1.2.3.1

Since we're at it, we might as well if our DNS settings are OK:

root@localhost:~# vi /etc/resolv.conf
domain members.linode.com
search members.linode.com
nameserver 109.74.193.20
nameserver 109.74.194.20
nameserver 109.74.192.20
options rotate

Fell free to change your hostname if you wish, something I didn't do for my PBX. Now, let's update our system with the latest packages and install any necessary prerequisites for Asterisk and FreePBX.

root@localhost:~# apt-get update
root@localhost:~# apt-get upgrade
root@localhost:~# apt-get install build-essential wget libssl-dev libncurses5-dev libnewt-dev libxml2-dev libsqlite3-dev libiksemel-utils libiksemel-dev linux-headers-`uname -r` openssh-server apache2 mysql-server mysql-client bison flex php5 php5-curl php5-cli php5-mysql php-pear php-db php5-gd curl sox libmysqlclient15-dev mpg123 sqlite3 pkg-config automake libtool autoconf git subversion uuid uuid-dev

Now, instead of moving on to the actual Asterisk installation, we need to go through an additional, intermediate step here; Asterisk uses the dahdi_dummy kernel module, which means we'll need to use PvGrub and change a few things around as well. Let's install the complete linux kernel for virtual machines:

root@localhost:~# apt-get install linux-virtual

Now we'll be presented with an image that asks us where to install GRUB to. Don't worry about it really, our next step will be to remove this.

From https://www.linode.com/docs/applications/voip/deploy-voip-services-with-asterisk-and-freepbx-on-ubuntu-12-04-precise
All right, let's move on with purging the previous GRUB config and creating one of our own:

root@localhost:~# apt-get purge grub2 grub-pc
root@localhost:~# apt-get install grub
root@localhost:~# update-grub
Searching for GRUB installation directory ... found: /boot/grub
Searching for default file ... Generating /boot/grub/default file and setting the default boot entry to 0
Searching for GRUB installation directory ... found: /boot/grub
Testing for an existing GRUB menu.lst file ... 

Could not find /boot/grub/menu.lst file. Would you like /boot/grub/menu.lst generated for you? (y/N)
y

Now you need to edit the boot configuration file as such: replace # groot=(hd0,0) with # groot=hd(0) and # indomU=detect with # indomU=false

root@localhost:~# vi /boot/grub/menu.lst
....
## default grub root device
## e.g. groot=(hd0,0)
# groot=(hd0)
...
## specify if running in Xen domU or have grub detect automatically
## update-grub will ignore non-xen kernels when running in domU and vice versa
## e.g. indomU=detect
##      indomU=true
##      indomU=false
# indomU=false
....

Let's commit the changes:

root@localhost:~# update-grub

Now go to your Linode dashboard, click on the profile and select the pv-grub-x86_64 (if you're running a 64-bit system, you'll need to select pv-grub-x86-32 if you're running a 32-bit system) kernel.


All right, we're half-way there! Reboot your system and we'll be ready to begin our actual Asterisk installation!

root@localhost:~# reboot

You should have now booted and been greeted with this:

Welcome to Ubuntu 12.04.5 LTS (GNU/Linux 3.2.0-77-virtual x86_64)


Let's start with our iptables rules first. My server's IP is 1.2.3.4, my offices' external IP is 2.3.4.5 and my SIP provider's IP is 3.4.5.6. Here I allow SIP, IAX, IAX2 and MGCP connections from my SIP provider. If you're not interested in IAX, IAX2 and MGCP just skip the lines with ports 5036, 4569 and 2727:

root@localhost:~# iptables -A INPUT -m state --state RELATED,ESTABLISHED -j ACCEPT
root@localhost:~# iptables -A INPUT -i lo -j ACCEPT
root@localhost:~# iptables -A 1.2.3.4 -j ACCEPT
root@localhost:~# iptables -A 2.3.4.5 -j ACCEPT
root@localhost:~# iptables -A INPUT -s 3.4.5.6 -p tcp -m multiport --dports 5060:5070 -j ACCEPT
root@localhost:~# iptables -A INPUT -s 3.4.5.6 -p udp -m multiport --dports 5060:5070 -j ACCEPT
root@localhost:~# iptables -A INPUT -s 3.4.5.6 -p udp -m udp --dport 4569 -j ACCEPT
root@localhost:~# iptables -A INPUT -s 3.4.5.6 -p udp -m udp --dport 5036 -j ACCEPT
root@localhost:~# iptables -A INPUT -s 3.4.5.6 -p udp -m udp --dport 2727 -j ACCEPT
root@localhost:~# iptables -A INPUT -j DROP
root@localhost:~# iptables -A FORWARD -j DROP
root@localhost:~# iptables -A OUTPUT -j ACCEPT
root@localhost:~# iptables-save > /etc/iptables.up.rules
root@localhost:~# vi /etc/init.d/iptables_fw
#!/bin/sh
### BEGIN INIT INFO
# Provides:          iptables_init
# Required-Start:    $local_fs $network
# Required-Stop:
# Default-Start:     2 3 4 5 
# Default-Stop:      0 1 6
# Short-Description: Firewall script
# Description:       Start iptables-based firewall
### END INIT INFO
#
iptables-restore < /etc/iptables.up.rules

root@localhost:~# chmod 755 /etc/init.d/iptables_fw
root@localhost:~# iptables -F
root@localhost:~# service iptables_fw start
root@localhost:~# update-rc.d iptables_fw defaults

Time to get moving with the actual Asterisk installation. Here we install PearDB and Google voice dependencies:

root@localhost:~# pear uninstall db
root@localhost:~# pear install db-1.7.14
root@localhost:~# cd /usr/src
root@localhost:/usr/src# wget https://iksemel.googlecode.com/files/iksemel-1.4.tar.gz
root@localhost:/usr/src# tar xf iksemel-1.4.tar.gz
root@localhost:/usr/src# cd iksemel-*
root@localhost:/usr/src/iksemel-1.4# ./configure
root@localhost:/usr/src/iksemel-1.4# make
root@localhost:/usr/src/iksemel-1.4# make install
root@localhost:/usr/src/iksemel-1.4# reboot

If you get a No releases available for package "pear.php.net/db" error while trying to reinstall PearDB just do:

root@localhost:~# pear install db-1.7.14
No releases available for package "pear.php.net/db"
root@localhost:~# mkdir /pear
root@localhost:~# cd /pear/
root@localhost:/pear# wget http://download.pear.php.net/package/DB-1.7.14.tgz
root@localhost:/pear# pear install DB-1.7.14.tgz

Download and install Asterisk, DAHDI, LIBPRI:

root@localhost:~# cd /usr/src/
root@localhost:/usr/src# wget http://downloads.asterisk.org/pub/telephony/dahdi-linux-complete/dahdi-linux-complete-current.tar.gz
root@localhost:/usr/src# wget http://downloads.asterisk.org/pub/telephony/libpri/libpri-1.4-current.tar.gz
root@localhost:/usr/src# wget http://downloads.asterisk.org/pub/telephony/asterisk/asterisk-11-current.tar.gz
root@localhost:/usr/src# tar xvfz dahdi-linux-complete-current.tar.gz
root@localhost:~# cd dahdi-linux-complete-*
root@localhost:/usr/src/dahdi-linux-complete-2.10.0.1+2.10.0.1# make all
root@localhost:/usr/src/dahdi-linux-complete-2.10.0.1+2.10.0.1# make install
root@localhost:/usr/src/dahdi-linux-complete-2.10.0.1+2.10.0.1# make config
root@localhost:/usr/src/dahdi-linux-complete-2.10.0.1+2.10.0.1# cd /usr/src
root@localhost:~# tar xvfz libpri-1.4-current.tar.gz
root@localhost:~# cd libpri-*
root@localhost:/usr/src/libpri-1.4.15# make
root@localhost:/usr/src/libpri-1.4.15# make install
root@localhost:/usr/src/libpri-1.4.15# cd /usr/src
root@localhost:~# tar xvfz asterisk-11-current.tar.gz
root@localhost:~# cd asterisk-*
root@localhost:/usr/src/asterisk-11.16.0# ./configure
root@localhost:/usr/src/asterisk-11.16.0# contrib/scripts/get_mp3_source.sh
root@localhost:/usr/src/asterisk-11.16.0# make menuselect

This will bring up a menu. Make sure all the modules, sounds and features you want are included. You at least need to select Resource Modules-> res_xmpp, Channel Drivers -> chan_motif and Compiler Flags -> BUILD_NATIVE


Save and Exit...

root@localhost:/usr/src/asterisk-11.16.0# make
root@localhost:/usr/src/asterisk-11.16.0# make install
root@localhost:/usr/src/asterisk-11.16.0# make config
root@localhost:/usr/src/asterisk-11.16.0# cd /var/lib/asterisk/sounds
root@localhost:/var/lib/asterisk/sounds# wget http://downloads.asterisk.org/pub/telephony/sounds/asterisk-extra-sounds-en-gsm-current.tar.gz
root@localhost:/var/lib/asterisk/sounds# tar xfz asterisk-extra-sounds-en-gsm-current.tar.gz
root@localhost:/var/lib/asterisk/sounds# rm asterisk-extra-sounds-en-gsm-current.tar.gz

That's it! Asterisk is now fully installed! Time to install FreePBX:

root@localhost:/var/lib/asterisk/sounds# cd /usr/src
root@localhost:/usr/src# export VER_FREEPBX=2.11
root@localhost:/usr/src# git clone http://git.freepbx.org/scm/freepbx/framework.git freepbx
root@localhost:/usr/src# cd freepbx/
root@localhost:/usr/src/freepbx# git checkout release/${VER_FREEPBX}
root@localhost:/usr/src/freepbx# adduser asterisk --disabled-password --gecos "Asterisk User"
root@localhost:/usr/src/freepbx# chown asterisk. /var/run/asterisk
root@localhost:/usr/src/freepbx# chown -R asterisk. /etc/asterisk
root@localhost:/usr/src/freepbx# chown -R asterisk. /var/{lib,log,spool}/asterisk
root@localhost:/usr/src/freepbx# chown -R asterisk. /usr/lib/asterisk
root@localhost:/usr/src/freepbx# mkdir /var/www/html
root@localhost:/usr/src/freepbx# chown -R asterisk. /var/www/

Change PHP upload_max_filesize to 120MB and change the default Apache User and Group:

root@localhost:/usr/src/freepbx# sed -i 's/\(^upload_max_filesize = \).*/\120M/' /etc/php5/apache2/php.ini
root@localhost:/usr/src/freepbx# cp /etc/apache2/apache2.conf /etc/apache2/apache2.conf_orig
root@localhost:/usr/src/freepbx# sed -i 's/^\(User\|Group\).*/\1 asterisk/' /etc/apache2/apache2.conf
root@localhost:/usr/src/freepbx# service apache2 restart

Configure MySQL database:

root@localhost:/usr/src/freepbx# mysql_secure_installation
root@localhost:/usr/src/freepbx# export ASTERISK_DB_PW=amp109
root@localhost:/usr/src/freepbx# mysqladmin -u root create asterisk -p
root@localhost:/usr/src/freepbx# mysqladmin -u root create asteriskcdrdb -p
root@localhost:/usr/src/freepbx# mysql -u root asterisk -p < SQL/newinstall.sql 
root@localhost:/usr/src/freepbx# mysql -u root asteriskcdrdb -p < SQL/cdr_mysql_table.sql 
root@localhost:/usr/src/freepbx# mysql -u root -p -e "GRANT ALL PRIVILEGES ON asterisk.* TO asteriskuser@localhost IDENTIFIED BY '${ASTERISK_DB_PW}';"
root@localhost:/usr/src/freepbx# mysql -u root -p -e "GRANT ALL PRIVILEGES ON asteriskcdrdb.* TO asteriskuser@localhost IDENTIFIED BY '${ASTERISK_DB_PW}';"
root@localhost:/usr/src/freepbx# mysql -u root -p -e "flush privileges;"

Time to start it all up:

root@localhost:/usr/src/freepbx# ./start_asterisk start
root@localhost:/usr/src/freepbx# ./install_amp --username=asteriskuser --password=$ASTERISK_DB_PW --webroot /var/www
root@localhost:/usr/src/freepbx# amportal a ma download manager
root@localhost:/usr/src/freepbx# amportal a ma install manager
root@localhost:/usr/src/freepbx# amportal a ma installall
root@localhost:/usr/src/freepbx# amportal a reload

This should give you a few questions to answer, but accepting the default values is more than recommended EXCEPT the "Enter the IP ADDRESS or hostname used to access the AMP web-admin". Obviously you should enter your server's IP address there. In my case that would be 1.2.3.4.

Almost there:

root@localhost:/usr/src/freepbx# ln -s /var/lib/asterisk/moh /var/lib/asterisk/mohmp3
root@localhost:/usr/src/freepbx# amportal start 


After you enable and update the modules in FreePBX, you might see the following error: Symlink from modules failed

To correct this error just delete the list of failed files:

root@localhost:/usr/src/freepbx# cd /etc/asterisk
root@localhost:/etc/asterisk# rm ccss.conf confbridge.conf features.conf sip.conf iax.conf logger.conf extensions.conf sip_notify.conf

References: https://www.linode.com/docs/applications/voip/deploy-voip-services-with-asterisk-and-freepbx-on-ubuntu-12-04-precise
http://wiki.freepbx.org/pages/viewpage.action?pageId=1409028#InstallingFreePBXonUbuntu12.04Server%28PrecisePangolin%29-InstallandConfigureFreePBX