Cloud PBXes are amazing. Is your internet down? Move your laptop/tablet/smartphone to the nearest publicly available WiFi spot and you can still catch that important call or conference using a softphone without anyone knowing. Couldn't make it in time to the office? Same. Ill and stayed at home? Use a softphone from your own network. Costs? Unbelievably low; any savings from running your own PBX server instead will start to show after years.
Well, let's create our own cloud PBX then.
Honestly, if you want to set up your own cloud PBX, you can't do any better than getting Ward Mundy's AMIs (here's a link to them) and just anwering a few questions his automated script will ask. Easy and secure.
But, what if we want to create our own? Start from the very beginning? Or maybe we don't want all the bells and whistles Ward Mundy provides us? Or perhaps we want to deploy on a different platform than Amazon? Or maybe CentOS just isn't our cup of tea?
Let's start deploying on Linode then.
I'm going to use Ubuntu 12.0.4 LTS for this.
First of all, we'll need configure our server with a static IP. For this example's sake my server will use 1.2.3.4.
Since we're at it, we might as well if our DNS settings are OK:
Fell free to change your hostname if you wish, something I didn't do for my PBX. Now, let's update our system with the latest packages and install any necessary prerequisites for Asterisk and FreePBX.
Now, instead of moving on to the actual Asterisk installation, we need to go through an additional, intermediate step here; Asterisk uses the dahdi_dummy kernel module, which means we'll need to use PvGrub and change a few things around as well. Let's install the complete linux kernel for virtual machines:
Now we'll be presented with an image that asks us where to install GRUB to. Don't worry about it really, our next step will be to remove this.
All right, let's move on with purging the previous GRUB config and creating one of our own:
Well, let's create our own cloud PBX then.
Honestly, if you want to set up your own cloud PBX, you can't do any better than getting Ward Mundy's AMIs (here's a link to them) and just anwering a few questions his automated script will ask. Easy and secure.
But, what if we want to create our own? Start from the very beginning? Or maybe we don't want all the bells and whistles Ward Mundy provides us? Or perhaps we want to deploy on a different platform than Amazon? Or maybe CentOS just isn't our cup of tea?
Let's start deploying on Linode then.
I'm going to use Ubuntu 12.0.4 LTS for this.
First of all, we'll need configure our server with a static IP. For this example's sake my server will use 1.2.3.4.
root@localhost:~# vi /etc/network/interfaces
# This file describes the network interfaces available on your system
# and how to activate them. For more information, see interfaces(5).

# The loopback network interface
auto lo
iface lo inet loopback

# The primary network interface
auto eth0
#iface eth0 inet dhcp
iface eth0 inet static
        address 1.2.3.4/24
        gateway 1.2.3.1
Since we're at it, we might as well if our DNS settings are OK:
root@localhost:~# vi /etc/resolv.conf
domain members.linode.com
search members.linode.com
nameserver 109.74.193.20
nameserver 109.74.194.20
nameserver 109.74.192.20
options rotate
Fell free to change your hostname if you wish, something I didn't do for my PBX. Now, let's update our system with the latest packages and install any necessary prerequisites for Asterisk and FreePBX.
root@localhost:~# apt-get update
root@localhost:~# apt-get upgrade
root@localhost:~# apt-get install build-essential wget libssl-dev libncurses5-dev libnewt-dev libxml2-dev libsqlite3-dev libiksemel-utils libiksemel-dev linux-headers-`uname -r` openssh-server apache2 mysql-server mysql-client bison flex php5 php5-curl php5-cli php5-mysql php-pear php-db php5-gd curl sox libmysqlclient15-dev mpg123 sqlite3 pkg-config automake libtool autoconf git subversion uuid uuid-dev
Now, instead of moving on to the actual Asterisk installation, we need to go through an additional, intermediate step here; Asterisk uses the dahdi_dummy kernel module, which means we'll need to use PvGrub and change a few things around as well. Let's install the complete linux kernel for virtual machines:
root@localhost:~# apt-get install linux-virtualNow we'll be presented with an image that asks us where to install GRUB to. Don't worry about it really, our next step will be to remove this.
 |
| From https://www.linode.com/docs/applications/voip/deploy-voip-services-with-asterisk-and-freepbx-on-ubuntu-12-04-precise |
root@localhost:~# apt-get purge grub2 grub-pc
root@localhost:~# apt-get install grub
root@localhost:~# update-grubSearching for GRUB installation directory ... found: /boot/grub
Searching for default file ... Generating /boot/grub/default file and setting the default boot entry to 0
Searching for GRUB installation directory ... found: /boot/grub
Testing for an existing GRUB menu.lst file ...

Could not find /boot/grub/menu.lst file. Would you like /boot/grub/menu.lst generated for you? (y/N)y
Now you need to edit the boot configuration file as such: replace # groot=(hd0,0) with # groot=hd(0) and # indomU=detect with # indomU=false
root@localhost:~# vi /boot/grub/menu.lst....
## default grub root device
## e.g. groot=(hd0,0)
# groot=(hd0)
...
## specify if running in Xen domU or have grub detect automatically
## update-grub will ignore non-xen kernels when running in domU and vice versa
## e.g. indomU=detect
##      indomU=true
##      indomU=false
# indomU=false
....
Let's commit the changes:
root@localhost:~# update-grub
Now go to your Linode dashboard, click on the profile and select the pv-grub-x86_64 (if you're running a 64-bit system, you'll need to select pv-grub-x86-32 if you're running a 32-bit system) kernel.

All right, we're half-way there! Reboot your system and we'll be ready to begin our actual Asterisk installation!
root@localhost:~# reboot
You should have now booted and been greeted with this:
Welcome to Ubuntu 12.04.5 LTS (GNU/Linux 3.2.0-77-virtual x86_64)Let's start with our iptables rules first. My server's IP is 1.2.3.4, my offices' external IP is 2.3.4.5 and my SIP provider's IP is 3.4.5.6. Here I allow SIP, IAX, IAX2 and MGCP connections from my SIP provider. If you're not interested in IAX, IAX2 and MGCP just skip the lines with ports 5036, 4569 and 2727:
root@localhost:~# iptables -A INPUT -m state --state RELATED,ESTABLISHED -j ACCEPT
root@localhost:~# iptables -A INPUT -i lo -j ACCEPT
root@localhost:~# iptables -A 1.2.3.4 -j ACCEPT
root@localhost:~# iptables -A 2.3.4.5 -j ACCEPT
root@localhost:~# iptables -A INPUT -s 3.4.5.6 -p tcp -m multiport --dports 5060:5070 -j ACCEPT
root@localhost:~# iptables -A INPUT -s 3.4.5.6 -p udp -m multiport --dports 5060:5070 -j ACCEPT
root@localhost:~# iptables -A INPUT -s 3.4.5.6 -p udp -m udp --dport 4569 -j ACCEPT
root@localhost:~# iptables -A INPUT -s 3.4.5.6 -p udp -m udp --dport 5036 -j ACCEPT
root@localhost:~# iptables -A INPUT -s 3.4.5.6 -p udp -m udp --dport 2727 -j ACCEPT
root@localhost:~# iptables -A INPUT -j DROP
root@localhost:~# iptables -A FORWARD -j DROP
root@localhost:~# iptables -A OUTPUT -j ACCEPT
root@localhost:~# iptables-save > /etc/iptables.up.rules
root@localhost:~# vi /etc/init.d/iptables_fw#!/bin/sh
### BEGIN INIT INFO
# Provides:          iptables_init
# Required-Start:    $local_fs $network
# Required-Stop:
# Default-Start:     2 3 4 5
# Default-Stop:      0 1 6
# Short-Description: Firewall script
# Description:       Start iptables-based firewall
### END INIT INFO
#
iptables-restore < /etc/iptables.up.rules

root@localhost:~# chmod 755 /etc/init.d/iptables_fw
root@localhost:~# iptables -F
root@localhost:~# service iptables_fw start
root@localhost:~# update-rc.d iptables_fw defaults
Time to get moving with the actual Asterisk installation. Here we install PearDB and Google voice dependencies:
root@localhost:~# pear uninstall db
root@localhost:~# pear install db-1.7.14
root@localhost:~# cd /usr/src
root@localhost:/usr/src# wget https://iksemel.googlecode.com/files/iksemel-1.4.tar.gz
root@localhost:/usr/src# tar xf iksemel-1.4.tar.gz
root@localhost:/usr/src# cd iksemel-*
root@localhost:/usr/src/iksemel-1.4# ./configure
root@localhost:/usr/src/iksemel-1.4# make
root@localhost:/usr/src/iksemel-1.4# make install
root@localhost:/usr/src/iksemel-1.4# reboot
If you get a No releases available for package "pear.php.net/db" error while trying to reinstall PearDB just do:
root@localhost:~# pear install db-1.7.14No releases available for package "pear.php.net/db"root@localhost:~# mkdir /pear
root@localhost:~# cd /pear/
root@localhost:/pear# wget http://download.pear.php.net/package/DB-1.7.14.tgz
root@localhost:/pear# pear install DB-1.7.14.tgz
Download and install Asterisk, DAHDI, LIBPRI:
root@localhost:~# cd /usr/src/ root@localhost:/usr/src# wget http://downloads.asterisk.org/pub/telephony/dahdi-linux-complete/dahdi-linux-complete-current.tar.gz root@localhost:/usr/src# wget http://downloads.asterisk.org/pub/telephony/libpri/libpri-1.4-current.tar.gz root@localhost:/usr/src# wget http://downloads.asterisk.org/pub/telephony/asterisk/asterisk-11-current.tar.gz root@localhost:/usr/src# tar xvfz dahdi-linux-complete-current.tar.gz root@localhost:~# cd dahdi-linux-complete-* root@localhost:/usr/src/dahdi-linux-complete-2.10.0.1+2.10.0.1# make all root@localhost:/usr/src/dahdi-linux-complete-2.10.0.1+2.10.0.1# make install root@localhost:/usr/src/dahdi-linux-complete-2.10.0.1+2.10.0.1# make configroot@localhost:/usr/src/dahdi-linux-complete-2.10.0.1+2.10.0.1#cd /usr/src root@localhost:~# tar xvfz libpri-1.4-current.tar.gz root@localhost:~# cd libpri-* root@localhost:/usr/src/libpri-1.4.15# make root@localhost:/usr/src/libpri-1.4.15# make installroot@localhost:/usr/src/libpri-1.4.15#cd /usr/src root@localhost:~# tar xvfz asterisk-11-current.tar.gz root@localhost:~# cd asterisk-* root@localhost:/usr/src/asterisk-11.16.0# ./configure root@localhost:/usr/src/asterisk-11.16.0# contrib/scripts/get_mp3_source.sh root@localhost:/usr/src/asterisk-11.16.0# make menuselect
This will bring up a menu. Make sure all the modules, sounds and features you want are included. You at least need to select Resource Modules-> res_xmpp, Channel Drivers -> chan_motif and Compiler Flags -> BUILD_NATIVE


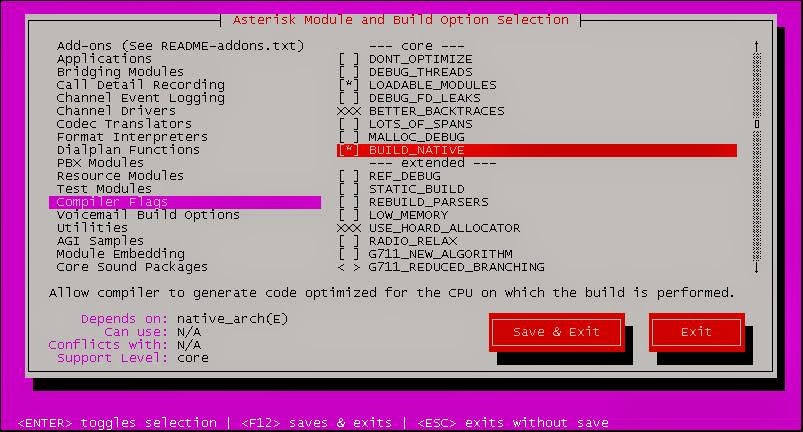
Save and Exit...
root@localhost:/usr/src/asterisk-11.16.0#makeroot@localhost:/usr/src/asterisk-11.16.0#make installroot@localhost:/usr/src/asterisk-11.16.0#make configcd /var/lib/asterisk/sounds root@localhost:/var/lib/asterisk/sounds# wget http://downloads.asterisk.org/pub/telephony/sounds/asterisk-extra-sounds-en-gsm-current.tar.gz root@localhost:/var/lib/asterisk/sounds# tar xfz asterisk-extra-sounds-en-gsm-current.tar.gz root@localhost:/var/lib/asterisk/sounds# rm asterisk-extra-sounds-en-gsm-current.tar.gzroot@localhost:/usr/src/asterisk-11.16.0#
That's it! Asterisk is now fully installed! Time to install FreePBX:
root@localhost:/var/lib/asterisk/sounds# cd /usr/src
root@localhost:/usr/src# export VER_FREEPBX=2.11
root@localhost:/usr/src# git clone http://git.freepbx.org/scm/freepbx/framework.git freepbx
root@localhost:/usr/src# cd freepbx/
root@localhost:/usr/src/freepbx# git checkout release/${VER_FREEPBX}
root@localhost:/usr/src/freepbx# adduser asterisk --disabled-password --gecos "Asterisk User"
root@localhost:/usr/src/freepbx# chown asterisk. /var/run/asterisk
root@localhost:/usr/src/freepbx# chown -R asterisk. /etc/asterisk
root@localhost:/usr/src/freepbx# chown -R asterisk. /var/{lib,log,spool}/asterisk
root@localhost:/usr/src/freepbx# chown -R asterisk. /usr/lib/asterisk
root@localhost:/usr/src/freepbx# mkdir /var/www/html
root@localhost:/usr/src/freepbx# chown -R asterisk. /var/www/
Change PHP upload_max_filesize to 120MB and change the default Apache User and Group:
root@localhost:/usr/src/freepbx# sed -i 's/\(^upload_max_filesize = \).*/\120M/' /etc/php5/apache2/php.ini
root@localhost:/usr/src/freepbx# cp /etc/apache2/apache2.conf /etc/apache2/apache2.conf_orig
root@localhost:/usr/src/freepbx# sed -i 's/^\(User\|Group\).*/\1 asterisk/' /etc/apache2/apache2.conf
root@localhost:/usr/src/freepbx# service apache2 restart
Configure MySQL database:
root@localhost:/usr/src/freepbx# mysql_secure_installation
root@localhost:/usr/src/freepbx# export ASTERISK_DB_PW=amp109
root@localhost:/usr/src/freepbx# mysqladmin -u root create asterisk -p
root@localhost:/usr/src/freepbx# mysqladmin -u root create asteriskcdrdb -p
root@localhost:/usr/src/freepbx# mysql -u root asterisk -p < SQL/newinstall.sql
root@localhost:/usr/src/freepbx# mysql -u root asteriskcdrdb -p < SQL/cdr_mysql_table.sql
root@localhost:/usr/src/freepbx# mysql -u root -p -e "GRANT ALL PRIVILEGES ON asterisk.* TO asteriskuser@localhost IDENTIFIED BY '${ASTERISK_DB_PW}';"
root@localhost:/usr/src/freepbx# mysql -u root -p -e "GRANT ALL PRIVILEGES ON asteriskcdrdb.* TO asteriskuser@localhost IDENTIFIED BY '${ASTERISK_DB_PW}';"
root@localhost:/usr/src/freepbx# mysql -u root -p -e "flush privileges;"
Time to start it all up:
root@localhost:/usr/src/freepbx# ./start_asterisk start
root@localhost:/usr/src/freepbx# ./install_amp --username=asteriskuser --password=$ASTERISK_DB_PW --webroot /var/www
root@localhost:/usr/src/freepbx# amportal a ma download manager
root@localhost:/usr/src/freepbx# amportal a ma install manager
root@localhost:/usr/src/freepbx# amportal a ma installall
root@localhost:/usr/src/freepbx# amportal a reload
This should give you a few questions to answer, but accepting the default values is more than recommended EXCEPT the "Enter the IP ADDRESS or hostname used to access the AMP web-admin". Obviously you should enter your server's IP address there. In my case that would be 1.2.3.4.
Almost there:
root@localhost:/usr/src/freepbx# ln -s /var/lib/asterisk/moh /var/lib/asterisk/mohmp3
root@localhost:/usr/src/freepbx# amportal start

After you enable and update the modules in FreePBX, you might see the following error: Symlink from modules failed
To correct this error just delete the list of failed files:
root@localhost:/usr/src/freepbx# cd /etc/asterisk
root@localhost:/etc/asterisk# rm ccss.conf confbridge.conf features.conf sip.conf iax.conf logger.conf extensions.conf sip_notify.conf
References: https://www.linode.com/docs/applications/voip/deploy-voip-services-with-asterisk-and-freepbx-on-ubuntu-12-04-precise
http://wiki.freepbx.org/pages/viewpage.action?pageId=1409028#InstallingFreePBXonUbuntu12.04Server%28PrecisePangolin%29-InstallandConfigureFreePBX
Thanks for the tutorial, but I advise everyone to get the help of the experts first. This is good only for trial basis. But on real time it causes many problems. I am using cloud hosting services with the help of experts provided by Go4hosting.
ReplyDeleteWhat kind of problems? I've been using this kind of setup for a while and it works like a charm.
Delete