Showing posts with label virtualization. Show all posts

Friday, March 6, 2015

Create your own Cloud PBX with Asterisk and FreePBX Part 2


But what if we want to deploy on AWS? Well, here's the guide to that too.

a) Go to your AWS Management Console and under "Compute" select "EC2".
b) Allocate a new elastic IP
c) Launch a Red Hat Enterprise Linux 6.6 HVM instance
d) When asked about security Groups, just allow all. We'll be using iptables for this purpose, which is more flexible than Amazon's firewall
e) Set up your key pairs
f) Launch
g) Associate your elastic IP with your instance
h) SSH to your server using the key pair and username ec2-user

Let's start with our iptables rules first. My server's IP is 1.2.3.4, my offices' external IP is 2.3.4.5 and my SIP provider's IP is 3.4.5.6. Here I allow SIP, IAX, IAX2 and MGCP connections from my SIP provider. If you're not interested in IAX, IAX2 and MGCP just skip the lines with ports 5036, 4569 and 2727:

[root@ip-1-2-3-4 ~]# iptables -F
[root@ip-1-2-3-4 ~]# iptables -A INPUT -m state --state RELATED,ESTABLISHED -j ACCEPT
[root@ip-1-2-3-4 ~]# iptables -A INPUT -i lo -j ACCEPT
[root@ip-1-2-3-4 ~]# iptables -A 1.2.3.4 -j ACCEPT
[root@ip-1-2-3-4 ~]# iptables -A 2.3.4.5 -j ACCEPT
[root@ip-1-2-3-4 ~]# iptables -A INPUT -s 3.4.5.6 -p tcp -m multiport --dports 5060:5070 -j ACCEPT
[root@ip-1-2-3-4 ~]# iptables -A INPUT -s 3.4.5.6 -p udp -m multiport --dports 5060:5070 -j ACCEPT
[root@ip-1-2-3-4 ~]# iptables -A INPUT -s 3.4.5.6 -p udp -m udp --dport 4569 -j ACCEPT
[root@ip-1-2-3-4 ~]# iptables -A INPUT -s 3.4.5.6 -p udp -m udp --dport 5036 -j ACCEPT
[root@ip-1-2-3-4 ~]# iptables -A INPUT -s 3.4.5.6 -p udp -m udp --dport 2727 -j ACCEPT
[root@ip-1-2-3-4 ~]# iptables -A INPUT -j DROP
[root@ip-1-2-3-4 ~]# iptables -A FORWARD -j DROP
[root@ip-1-2-3-4 ~]# iptables -A OUTPUT -j ACCEPT
[root@ip-1-2-3-4 ~]# iptables-save > /etc/sysconfig/iptables

Let's disable SELinux:

[root@ip-1-2-3-4 ~]# setenforce 0
[root@ip-1-2-3-4 ~]# vi /etc/sysconfig/selinux
# This file controls the state of SELinux on the system.
# SELINUX= can take one of these three values:
#     enforcing - SELinux security policy is enforced.
#     permissive - SELinux prints warnings instead of enforcing.
#     disabled - No SELinux policy is loaded.
SELINUX=disabled
# SELINUXTYPE= can take one of these two values:
#     targeted - Targeted processes are protected,
#     mls - Multi Level Security protection.
SELINUXTYPE=targeted


OK, here's a fun fact: I couldn't find newt-devel or audiofile-devel anywhere on a trusted RHEL repo. So, I decided to cheat a bit:

[root@ip-1-2-3-4 ~]#  vi /etc/yum.repos.d/centos.repo
[centos]
name=CentOS $releasever - $basearch
baseurl=http://ftp.heanet.ie/pub/centos/6/os/$basearch/
enabled=0
gpgcheck=0

Let's install the EPEL and Remi repos, update our system and install any required dependencies:

[root@ip-1-2-3-4 ~]# wget http://download.fedoraproject.org/pub/epel/6/x86_64/epel-release-6-8.noarch.rpm
[root@ip-1-2-3-4 ~]# rpm -ivh epel-release-6-8.noarch.rpm
[root@ip-1-2-3-4 ~]# rpm --import http://rpms.famillecollet.com/RPM-GPG-KEY-remi
[root@ip-1-2-3-4 ~]# rpm -ivh http://rpms.famillecollet.com/enterprise/remi-release-6.rpm
[root@ip-1-2-3-4 ~]# yum -y update
[root@ip-1-2-3-4 ~]# yum -y groupinstall core
[root@ip-1-2-3-4 ~]# yum -y groupinstall base
[root@ip-1-2-3-4 ~]# yum -y install --enablerepo=epel,remi,centos gcc gcc-c++ lynx bison mysql-devel mysql-server php php-mysql php-pear php-mbstring tftp-server httpd make ncurses-devel libtermcap-devel sendmail sendmail-cf caching-nameserver sox newt newt-devel libxml2-devel libtiff-devel audiofile audiofile-devel sqlite-devel gtk2-devel kernel-devel git subversion php-process crontabs cronie cronie-anacron openssl-devel
[root@ip-1-2-3-4 ~]# yum -y install kernel-headers-`uname -r` kernel-devel-`uname -r` glibc-headers

Autostart MySQL and Apache:

[root@ip-1-2-3-4 ~]# chkconfig --level 345 mysqld on
[root@ip-1-2-3-4 ~]# chkconfig --level 345 httpd on

Time to get moving with the actual Asterisk installation. Here we install PearDB and Google voice dependencies:

[root@ip-1-2-3-4 ~]# pear install db-1.7.14
[root@ip-1-2-3-4 ~]# cd /usr/src
[root@ip-1-2-3-4 src]# wget https://iksemel.googlecode.com/files/iksemel-1.4.tar.gz
[root@ip-1-2-3-4 src]# tar xf iksemel-1.4.tar.gz
[root@ip-1-2-3-4 src]# cd iksemel-*
[root@ip-1-2-3-4 iksemel-1.4]# ./configure
[root@ip-1-2-3-4 iksemel-1.4]# make
[root@ip-1-2-3-4 iksemel-1.4]# make install
[root@ip-1-2-3-4 iksemel-1.4]# reboot

If you get a No releases available for package "pear.php.net/db" error while trying to reinstall PearDB just do:

[root@ip-1-2-3-4 ~]# pear install db-1.7.14
No releases available for package "pear.php.net/db"
[root@ip-1-2-3-4 ~]# mkdir /pear
[root@ip-1-2-3-4 pear]# cd /pear/
[root@ip-1-2-3-4 pear]# wget http://download.pear.php.net/package/DB-1.7.14.tgz
[root@ip-1-2-3-4 pear]# pear install DB-1.7.14.tgz

Download and install Asterisk, DAHDI, LIBPRI:

[root@ip-1-2-3-4 ~]# cd /usr/src/
[root@ip-1-2-3-4 src]# wget http://downloads.asterisk.org/pub/telephony/dahdi-linux-complete/dahdi-linux-complete-current.tar.gz
[root@ip-1-2-3-4 src]# wget http://downloads.asterisk.org/pub/telephony/libpri/libpri-1.4-current.tar.gz
[root@ip-1-2-3-4 src]# wget http://downloads.asterisk.org/pub/telephony/asterisk/asterisk-11-current.tar.gz
[root@ip-1-2-3-4 src]# tar xvfz dahdi-linux-complete-current.tar.gz
[root@ip-1-2-3-4 src]# cd dahdi-linux-complete-*
[root@ip-1-2-3-4 dahdi-linux-complete-2.10.0.1+2.10.0.1]# make all
[root@ip-1-2-3-4 dahdi-linux-complete-2.10.0.1+2.10.0.1]# make install
[root@ip-1-2-3-4 dahdi-linux-complete-2.10.0.1+2.10.0.1]# make config
[root@ip-1-2-3-4 dahdi-linux-complete-2.10.0.1+2.10.0.1]# cd /usr/src
[root@ip-1-2-3-4 src]# tar xvfz libpri-1.4-current.tar.gz
[root@ip-1-2-3-4 src]# cd libpri-*
[root@ip-1-2-3-4 libpri-1.4.15]# make
[root@ip-1-2-3-4 libpri-1.4.15]# make install
[root@ip-1-2-3-4 libpri-1.4.15]# cd /usr/src
[root@ip-1-2-3-4 src]# tar xvfz asterisk-11-current.tar.gz
[root@ip-1-2-3-4 src]# cd asterisk-*
[root@ip-1-2-3-4 asterisk-11.16.0]# ./configure
[root@ip-1-2-3-4 asterisk-11.16.0]# contrib/scripts/get_mp3_source.sh
[root@ip-1-2-3-4 asterisk-11.16.0]# make menuselect

This will bring up a menu. Make sure all the modules, sounds and features you want are included. You at least need to select Resource Modules-> res_xmpp, Channel Drivers -> chan_motif and Compiler Flags -> BUILD_NATIVE


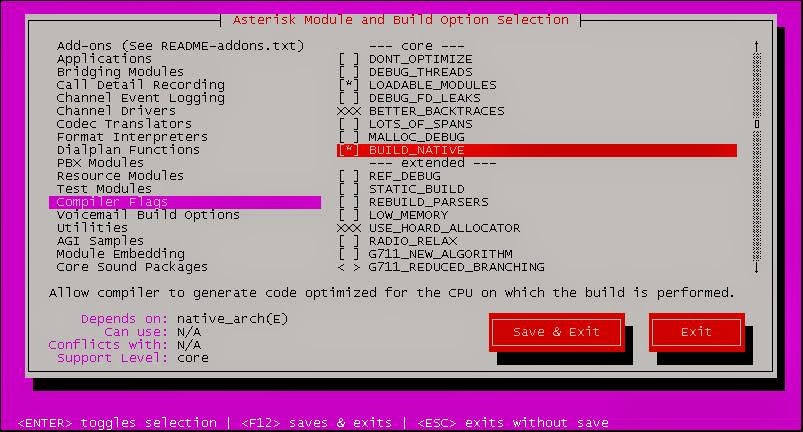
Save and Exit...

[root@ip-1-2-3-4 asterisk-11.16.0]# make
[root@ip-1-2-3-4 asterisk-11.16.0]# make install
[root@ip-1-2-3-4 asterisk-11.16.0]# make config
[root@ip-1-2-3-4 asterisk-11.16.0]# cd /var/lib/asterisk/sounds
[root@ip-1-2-3-4 sounds]# wget http://downloads.asterisk.org/pub/telephony/sounds/asterisk-extra-sounds-en-gsm-current.tar.gz
[root@ip-1-2-3-4 sounds]# tar xfz asterisk-extra-sounds-en-gsm-current.tar.gz
[root@ip-1-2-3-4 sounds]# rm asterisk-extra-sounds-en-gsm-current.tar.gz

That's it! Asterisk is now fully installed! Time to install FreePBX:

[root@ip-1-2-3-4 sounds]# cd /usr/src
[root@ip-1-2-3-4 src]# export VER_FREEPBX=2.11
[root@ip-1-2-3-4 src]# git clone http://git.freepbx.org/scm/freepbx/framework.git freepbx
[root@ip-1-2-3-4 src]# cd freepbx/
[root@ip-1-2-3-4 freepbx]# git checkout release/${VER_FREEPBX}
[root@ip-1-2-3-4 freepbx]# adduser asterisk -M -c "Asterisk User"
[root@ip-1-2-3-4 freepbx]# chown asterisk. /var/run/asterisk
[root@ip-1-2-3-4 freepbx]# chown -R asterisk. /etc/asterisk
[root@ip-1-2-3-4 freepbx]# chown -R asterisk. /var/{lib,log,spool}/asterisk
[root@ip-1-2-3-4 freepbx]# chown -R asterisk. /usr/lib/asterisk
[root@ip-1-2-3-4 freepbx]# mkdir /var/www/html
[root@ip-1-2-3-4 freepbx]# chown -R asterisk. /var/www/

Change PHP upload_max_filesize to 120MB and change the default Apache User and Group:

[root@ip-1-2-3-4 freepbx]# chown -R asterisk. /var/www/
[root@ip-1-2-3-4 freepbx]# sed -i 's/\(^upload_max_filesize = \).*/\120M/' /etc/php.ini
[root@ip-1-2-3-4 freepbx]# cp /etc/httpd/conf/httpd.conf /etc/httpd/conf/httpd.conf_orig
[root@ip-1-2-3-4 freepbx]# sed -i 's/^\(User\|Group\).*/\1 asterisk/' /etc/httpd/conf/httpd.conf
[root@ip-1-2-3-4 freepbx]# sed -i 's/^DocumentRoot.*/DocumentRoot \"\/var\/www\/admin\"/g' /etc/httpd/conf/httpd.conf
[root@ip-1-2-3-4 freepbx]# service httpd restart

Configure MySQL database:

[root@ip-1-2-3-4 freepbx]# mysql_secure_installation
[root@ip-1-2-3-4 freepbx]# export ASTERISK_DB_PW=amp109
[root@ip-1-2-3-4 freepbx]# mysqladmin -u root create asterisk -p
[root@ip-1-2-3-4 freepbx]# mysqladmin -u root create asteriskcdrdb -p
[root@ip-1-2-3-4 freepbx]# mysql -u root asterisk -p < SQL/newinstall.sql 
[root@ip-1-2-3-4 freepbx]# mysql -u root asteriskcdrdb -p < SQL/cdr_mysql_table.sql 
[root@ip-1-2-3-4 freepbx]# mysql -u root -p -e "GRANT ALL PRIVILEGES ON asterisk.* TO asteriskuser@localhost IDENTIFIED BY '${ASTERISK_DB_PW}';"
[root@ip-1-2-3-4 freepbx]# mysql -u root -p -e "GRANT ALL PRIVILEGES ON asteriskcdrdb.* TO asteriskuser@localhost IDENTIFIED BY '${ASTERISK_DB_PW}';"
[root@ip-1-2-3-4 freepbx]# mysql -u root -p -e "flush privileges;"

Time to start it all up:

[root@ip-1-2-3-4 freepbx]# ln -s /usr/lib/libasteriskssl.so.1 /usr/lib64/libasteriskssl.so.1
[root@ip-1-2-3-4 freepbx]# ./start_asterisk start
[root@ip-1-2-3-4 freepbx]# ./install_amp --username=asteriskuser --password=$ASTERISK_DB_PW --webroot /var/www
[root@ip-1-2-3-4 freepbx]# amportal a ma download manager
[root@ip-1-2-3-4 freepbx]# amportal a ma install manager
[root@ip-1-2-3-4 freepbx]# amportal a ma installall
[root@ip-1-2-3-4 freepbx]# amportal a reload

This should give you a few questions to answer, but accepting the default values is more than recommended EXCEPT the "Enter the IP ADDRESS or hostname used to access the AMP web-admin". Obviously you should enter your server's IP address there. In my case that would be 1.2.3.4.

Almost there:

[root@ip-1-2-3-4 freepbx]# ln -s /var/lib/asterisk/moh /var/lib/asterisk/mohmp3
[root@ip-1-2-3-4 freepbx]# amportal start


After you enable and update the modules in FreePBX, you might see the following error: Symlink from modules failed

To correct this error just delete the list of failed files:

[root@ip-1-2-3-4 freepbx]# cd /etc/asterisk
[root@ip-1-2-3-4 freepbx]# rm ccss.conf confbridge.conf features.conf sip.conf iax.conf logger.conf extensions.conf sip_notify.conf

References: http://wiki.freepbx.org/display/HTGS/Installing+FreePBX+2.11+on+Centos+6.3

Thursday, March 5, 2015

Create your own Cloud PBX with Asterisk and FreePBX Part 1

Cloud PBXes are amazing. Is your internet down? Move your laptop/tablet/smartphone to the nearest publicly available WiFi spot and you can still catch that important call or conference using a softphone without anyone knowing. Couldn't make it in time to the office? Same. Ill and stayed at home? Use a softphone from your own network. Costs? Unbelievably low; any savings from running your own PBX server instead will start to show after years.

Well, let's create our own cloud PBX then.

Honestly, if you want to set up your own cloud PBX, you can't do any better than getting Ward Mundy's AMIs (here's a link to them) and just anwering a few questions his automated script will ask. Easy and secure.

But, what if we want to create our own? Start from the very beginning? Or maybe we don't want all the bells and whistles Ward Mundy provides us? Or perhaps we want to deploy on a different platform than Amazon? Or maybe CentOS just isn't our cup of tea?

Let's start deploying on Linode then.

I'm going to use Ubuntu 12.0.4 LTS for this.

First of all, we'll need configure our server with a static IP. For this example's sake my server will use 1.2.3.4.

root@localhost:~# vi /etc/network/interfaces
# This file describes the network interfaces available on your system
# and how to activate them. For more information, see interfaces(5).

# The loopback network interface
auto lo
iface lo inet loopback

# The primary network interface
auto eth0
#iface eth0 inet dhcp
iface eth0 inet static
        address 1.2.3.4/24
        gateway 1.2.3.1

Since we're at it, we might as well if our DNS settings are OK:

root@localhost:~# vi /etc/resolv.conf
domain members.linode.com
search members.linode.com
nameserver 109.74.193.20
nameserver 109.74.194.20
nameserver 109.74.192.20
options rotate

Fell free to change your hostname if you wish, something I didn't do for my PBX. Now, let's update our system with the latest packages and install any necessary prerequisites for Asterisk and FreePBX.

root@localhost:~# apt-get update
root@localhost:~# apt-get upgrade
root@localhost:~# apt-get install build-essential wget libssl-dev libncurses5-dev libnewt-dev libxml2-dev libsqlite3-dev libiksemel-utils libiksemel-dev linux-headers-`uname -r` openssh-server apache2 mysql-server mysql-client bison flex php5 php5-curl php5-cli php5-mysql php-pear php-db php5-gd curl sox libmysqlclient15-dev mpg123 sqlite3 pkg-config automake libtool autoconf git subversion uuid uuid-dev

Now, instead of moving on to the actual Asterisk installation, we need to go through an additional, intermediate step here; Asterisk uses the dahdi_dummy kernel module, which means we'll need to use PvGrub and change a few things around as well. Let's install the complete linux kernel for virtual machines:

root@localhost:~# apt-get install linux-virtual

Now we'll be presented with an image that asks us where to install GRUB to. Don't worry about it really, our next step will be to remove this.

From https://www.linode.com/docs/applications/voip/deploy-voip-services-with-asterisk-and-freepbx-on-ubuntu-12-04-precise
All right, let's move on with purging the previous GRUB config and creating one of our own:

root@localhost:~# apt-get purge grub2 grub-pc
root@localhost:~# apt-get install grub
root@localhost:~# update-grub
Searching for GRUB installation directory ... found: /boot/grub
Searching for default file ... Generating /boot/grub/default file and setting the default boot entry to 0
Searching for GRUB installation directory ... found: /boot/grub
Testing for an existing GRUB menu.lst file ... 

Could not find /boot/grub/menu.lst file. Would you like /boot/grub/menu.lst generated for you? (y/N)
y

Now you need to edit the boot configuration file as such: replace # groot=(hd0,0) with # groot=hd(0) and # indomU=detect with # indomU=false

root@localhost:~# vi /boot/grub/menu.lst
....
## default grub root device
## e.g. groot=(hd0,0)
# groot=(hd0)
...
## specify if running in Xen domU or have grub detect automatically
## update-grub will ignore non-xen kernels when running in domU and vice versa
## e.g. indomU=detect
##      indomU=true
##      indomU=false
# indomU=false
....

Let's commit the changes:

root@localhost:~# update-grub

Now go to your Linode dashboard, click on the profile and select the pv-grub-x86_64 (if you're running a 64-bit system, you'll need to select pv-grub-x86-32 if you're running a 32-bit system) kernel.


All right, we're half-way there! Reboot your system and we'll be ready to begin our actual Asterisk installation!

root@localhost:~# reboot

You should have now booted and been greeted with this:

Welcome to Ubuntu 12.04.5 LTS (GNU/Linux 3.2.0-77-virtual x86_64)


Let's start with our iptables rules first. My server's IP is 1.2.3.4, my offices' external IP is 2.3.4.5 and my SIP provider's IP is 3.4.5.6. Here I allow SIP, IAX, IAX2 and MGCP connections from my SIP provider. If you're not interested in IAX, IAX2 and MGCP just skip the lines with ports 5036, 4569 and 2727:

root@localhost:~# iptables -A INPUT -m state --state RELATED,ESTABLISHED -j ACCEPT
root@localhost:~# iptables -A INPUT -i lo -j ACCEPT
root@localhost:~# iptables -A 1.2.3.4 -j ACCEPT
root@localhost:~# iptables -A 2.3.4.5 -j ACCEPT
root@localhost:~# iptables -A INPUT -s 3.4.5.6 -p tcp -m multiport --dports 5060:5070 -j ACCEPT
root@localhost:~# iptables -A INPUT -s 3.4.5.6 -p udp -m multiport --dports 5060:5070 -j ACCEPT
root@localhost:~# iptables -A INPUT -s 3.4.5.6 -p udp -m udp --dport 4569 -j ACCEPT
root@localhost:~# iptables -A INPUT -s 3.4.5.6 -p udp -m udp --dport 5036 -j ACCEPT
root@localhost:~# iptables -A INPUT -s 3.4.5.6 -p udp -m udp --dport 2727 -j ACCEPT
root@localhost:~# iptables -A INPUT -j DROP
root@localhost:~# iptables -A FORWARD -j DROP
root@localhost:~# iptables -A OUTPUT -j ACCEPT
root@localhost:~# iptables-save > /etc/iptables.up.rules
root@localhost:~# vi /etc/init.d/iptables_fw
#!/bin/sh
### BEGIN INIT INFO
# Provides:          iptables_init
# Required-Start:    $local_fs $network
# Required-Stop:
# Default-Start:     2 3 4 5 
# Default-Stop:      0 1 6
# Short-Description: Firewall script
# Description:       Start iptables-based firewall
### END INIT INFO
#
iptables-restore < /etc/iptables.up.rules

root@localhost:~# chmod 755 /etc/init.d/iptables_fw
root@localhost:~# iptables -F
root@localhost:~# service iptables_fw start
root@localhost:~# update-rc.d iptables_fw defaults

Time to get moving with the actual Asterisk installation. Here we install PearDB and Google voice dependencies:

root@localhost:~# pear uninstall db
root@localhost:~# pear install db-1.7.14
root@localhost:~# cd /usr/src
root@localhost:/usr/src# wget https://iksemel.googlecode.com/files/iksemel-1.4.tar.gz
root@localhost:/usr/src# tar xf iksemel-1.4.tar.gz
root@localhost:/usr/src# cd iksemel-*
root@localhost:/usr/src/iksemel-1.4# ./configure
root@localhost:/usr/src/iksemel-1.4# make
root@localhost:/usr/src/iksemel-1.4# make install
root@localhost:/usr/src/iksemel-1.4# reboot

If you get a No releases available for package "pear.php.net/db" error while trying to reinstall PearDB just do:

root@localhost:~# pear install db-1.7.14
No releases available for package "pear.php.net/db"
root@localhost:~# mkdir /pear
root@localhost:~# cd /pear/
root@localhost:/pear# wget http://download.pear.php.net/package/DB-1.7.14.tgz
root@localhost:/pear# pear install DB-1.7.14.tgz

Download and install Asterisk, DAHDI, LIBPRI:

root@localhost:~# cd /usr/src/
root@localhost:/usr/src# wget http://downloads.asterisk.org/pub/telephony/dahdi-linux-complete/dahdi-linux-complete-current.tar.gz
root@localhost:/usr/src# wget http://downloads.asterisk.org/pub/telephony/libpri/libpri-1.4-current.tar.gz
root@localhost:/usr/src# wget http://downloads.asterisk.org/pub/telephony/asterisk/asterisk-11-current.tar.gz
root@localhost:/usr/src# tar xvfz dahdi-linux-complete-current.tar.gz
root@localhost:~# cd dahdi-linux-complete-*
root@localhost:/usr/src/dahdi-linux-complete-2.10.0.1+2.10.0.1# make all
root@localhost:/usr/src/dahdi-linux-complete-2.10.0.1+2.10.0.1# make install
root@localhost:/usr/src/dahdi-linux-complete-2.10.0.1+2.10.0.1# make config
root@localhost:/usr/src/dahdi-linux-complete-2.10.0.1+2.10.0.1# cd /usr/src
root@localhost:~# tar xvfz libpri-1.4-current.tar.gz
root@localhost:~# cd libpri-*
root@localhost:/usr/src/libpri-1.4.15# make
root@localhost:/usr/src/libpri-1.4.15# make install
root@localhost:/usr/src/libpri-1.4.15# cd /usr/src
root@localhost:~# tar xvfz asterisk-11-current.tar.gz
root@localhost:~# cd asterisk-*
root@localhost:/usr/src/asterisk-11.16.0# ./configure
root@localhost:/usr/src/asterisk-11.16.0# contrib/scripts/get_mp3_source.sh
root@localhost:/usr/src/asterisk-11.16.0# make menuselect

This will bring up a menu. Make sure all the modules, sounds and features you want are included. You at least need to select Resource Modules-> res_xmpp, Channel Drivers -> chan_motif and Compiler Flags -> BUILD_NATIVE


Save and Exit...

root@localhost:/usr/src/asterisk-11.16.0# make
root@localhost:/usr/src/asterisk-11.16.0# make install
root@localhost:/usr/src/asterisk-11.16.0# make config
root@localhost:/usr/src/asterisk-11.16.0# cd /var/lib/asterisk/sounds
root@localhost:/var/lib/asterisk/sounds# wget http://downloads.asterisk.org/pub/telephony/sounds/asterisk-extra-sounds-en-gsm-current.tar.gz
root@localhost:/var/lib/asterisk/sounds# tar xfz asterisk-extra-sounds-en-gsm-current.tar.gz
root@localhost:/var/lib/asterisk/sounds# rm asterisk-extra-sounds-en-gsm-current.tar.gz

That's it! Asterisk is now fully installed! Time to install FreePBX:

root@localhost:/var/lib/asterisk/sounds# cd /usr/src
root@localhost:/usr/src# export VER_FREEPBX=2.11
root@localhost:/usr/src# git clone http://git.freepbx.org/scm/freepbx/framework.git freepbx
root@localhost:/usr/src# cd freepbx/
root@localhost:/usr/src/freepbx# git checkout release/${VER_FREEPBX}
root@localhost:/usr/src/freepbx# adduser asterisk --disabled-password --gecos "Asterisk User"
root@localhost:/usr/src/freepbx# chown asterisk. /var/run/asterisk
root@localhost:/usr/src/freepbx# chown -R asterisk. /etc/asterisk
root@localhost:/usr/src/freepbx# chown -R asterisk. /var/{lib,log,spool}/asterisk
root@localhost:/usr/src/freepbx# chown -R asterisk. /usr/lib/asterisk
root@localhost:/usr/src/freepbx# mkdir /var/www/html
root@localhost:/usr/src/freepbx# chown -R asterisk. /var/www/

Change PHP upload_max_filesize to 120MB and change the default Apache User and Group:

root@localhost:/usr/src/freepbx# sed -i 's/\(^upload_max_filesize = \).*/\120M/' /etc/php5/apache2/php.ini
root@localhost:/usr/src/freepbx# cp /etc/apache2/apache2.conf /etc/apache2/apache2.conf_orig
root@localhost:/usr/src/freepbx# sed -i 's/^\(User\|Group\).*/\1 asterisk/' /etc/apache2/apache2.conf
root@localhost:/usr/src/freepbx# service apache2 restart

Configure MySQL database:

root@localhost:/usr/src/freepbx# mysql_secure_installation
root@localhost:/usr/src/freepbx# export ASTERISK_DB_PW=amp109
root@localhost:/usr/src/freepbx# mysqladmin -u root create asterisk -p
root@localhost:/usr/src/freepbx# mysqladmin -u root create asteriskcdrdb -p
root@localhost:/usr/src/freepbx# mysql -u root asterisk -p < SQL/newinstall.sql 
root@localhost:/usr/src/freepbx# mysql -u root asteriskcdrdb -p < SQL/cdr_mysql_table.sql 
root@localhost:/usr/src/freepbx# mysql -u root -p -e "GRANT ALL PRIVILEGES ON asterisk.* TO asteriskuser@localhost IDENTIFIED BY '${ASTERISK_DB_PW}';"
root@localhost:/usr/src/freepbx# mysql -u root -p -e "GRANT ALL PRIVILEGES ON asteriskcdrdb.* TO asteriskuser@localhost IDENTIFIED BY '${ASTERISK_DB_PW}';"
root@localhost:/usr/src/freepbx# mysql -u root -p -e "flush privileges;"

Time to start it all up:

root@localhost:/usr/src/freepbx# ./start_asterisk start
root@localhost:/usr/src/freepbx# ./install_amp --username=asteriskuser --password=$ASTERISK_DB_PW --webroot /var/www
root@localhost:/usr/src/freepbx# amportal a ma download manager
root@localhost:/usr/src/freepbx# amportal a ma install manager
root@localhost:/usr/src/freepbx# amportal a ma installall
root@localhost:/usr/src/freepbx# amportal a reload

This should give you a few questions to answer, but accepting the default values is more than recommended EXCEPT the "Enter the IP ADDRESS or hostname used to access the AMP web-admin". Obviously you should enter your server's IP address there. In my case that would be 1.2.3.4.

Almost there:

root@localhost:/usr/src/freepbx# ln -s /var/lib/asterisk/moh /var/lib/asterisk/mohmp3
root@localhost:/usr/src/freepbx# amportal start 


After you enable and update the modules in FreePBX, you might see the following error: Symlink from modules failed

To correct this error just delete the list of failed files:

root@localhost:/usr/src/freepbx# cd /etc/asterisk
root@localhost:/etc/asterisk# rm ccss.conf confbridge.conf features.conf sip.conf iax.conf logger.conf extensions.conf sip_notify.conf

References: https://www.linode.com/docs/applications/voip/deploy-voip-services-with-asterisk-and-freepbx-on-ubuntu-12-04-precise
http://wiki.freepbx.org/pages/viewpage.action?pageId=1409028#InstallingFreePBXonUbuntu12.04Server%28PrecisePangolin%29-InstallandConfigureFreePBX

Friday, February 6, 2015

Install pfSense on XenServer Part 2

The process is going to take a while, so sit back until you see your pfSense VM available.


And of course the first thing we're going to do is add the NIC that we weren't allowed to when importing.


Time to boot up our pfSense. Once booted, it will notify that the previous NICs do not exist, but new ones do. Make sure you assign the correct ones, checking your MAC addresses from XenCenter's "Networking" Tab:


And that should be all there is to it. There's a chance a hard disk or NIC device changes its name after an update, but nothing we can't handle.


Install pfSense on XenServer Part 1

In this post I'll walk through the steps required to install pfSense (and pretty much any other OS for that matter) on XenServer. And this is because we're going to cheat. That's right.

It's really easy in principle: Install Oracle VirtualBox on your PC, create your virtual machine there and import it. Done. If you feel confident enough, go ahead and do it yourself but I'm going to actually go through it, as it has 1 or 2 things that if you don't get right, you might end up with problems.

On with it then:

Step 1: Install pfSense on a VirtualBox VM:


While creating the VM, the important part is making sure your hard drive file type is importable by XenServer. Select VMDK and you can't go wrong.


Add the same number of NICs that your VM in your XenServer will have. This step is not as important as the others, but that's how I do it. In this case, I only have WAN/LAN interfaces so I only need two.


Don't forget to add a pfSense ISO in the CDROM of your VM


After that, boot it up and follow the install screen. After the pfSense installation is finished, go ahead and configure your IPs as they would appear in your XenServer VM.


Here's another important detail: Go to the pfSense's shell and type:

/usr/local/sbin/ufslabels.sh

This command converts /etc/fstab entries to UFS labels rather than disk device names. This is useful because in case of an upgrade, the disk device names might change and you might get stuck with an unbootable pfSense until you try and resolve the issue.


We're done with VirtualBox so halt the system. it's time to import it to XenServer.


The process is rather easy, but it's included here for completess' sake:


At this point, you will only have only one network as an option to add. No worries, we'll just select one of the correct NICs and add the second one later.


Don't worry about OS fixups. Just continue.


This is getting graphics heavy, so I'm going to make this a 2-part post.

Wednesday, February 4, 2015

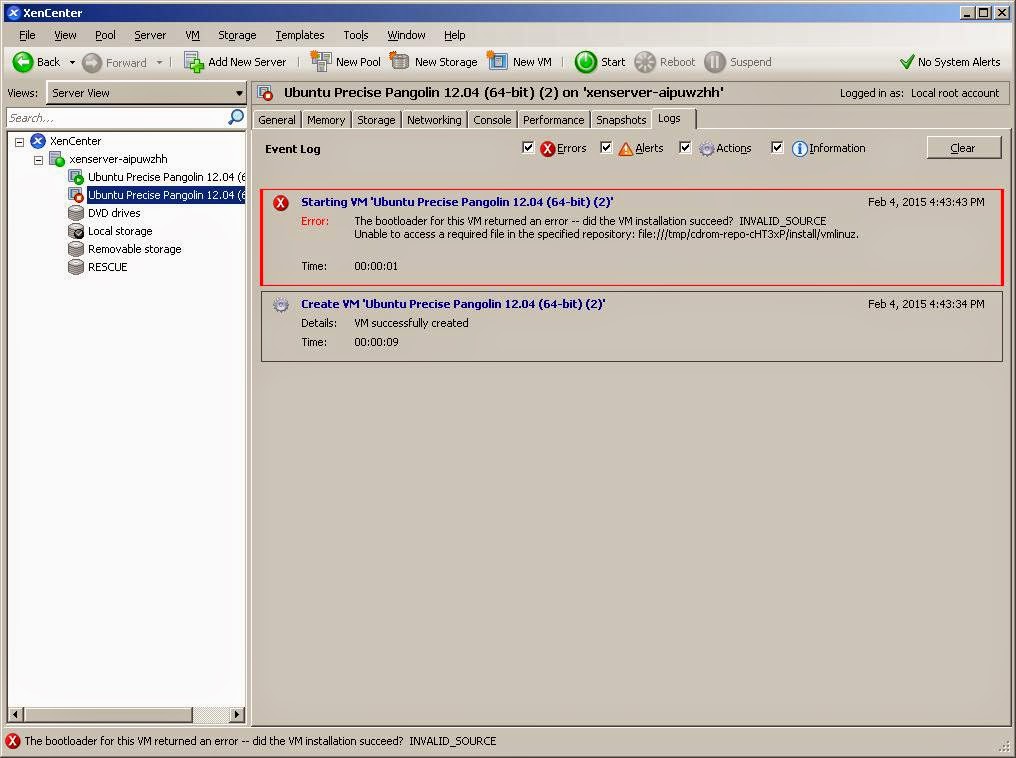
XenServer The bootloader for this VM returned an error Unable to access a required file in the specified repository: file:///tmp/cdrom-repo


Lovely, yes? It reads: Error: Starting VM 'Ubuntu Precise Pangolin 12.04 (64-bit) (2)' - The bootloader for this VM returned an error -- did the VM installation succeed?  INVALID_SOURCE
Unable to access a required file in the specified repository: file:///tmp/cdrom-repo-cHT3xP/install/vmlinuz.

What this means in simple terms is that the Virtual Machine is not configured to boot from an ISO.

[root@xenserver-aipuwzhh ~]# xe vm-list 
uuid ( RO)           : f5870ba2-c405-56a9-8022-41ca4fc362a1
     name-label ( RW): Ubuntu Precise Pangolin 12.04 (64-bit) (2)
    power-state ( RO): halted


uuid ( RO)           : 77c6963c-fb55-48e2-a799-82ea166d0748
     name-label ( RW): Control domain on host: xenserver-aipuwzhh
    power-state ( RO): running


uuid ( RO)           : 89ddbb9d-4c9e-16c6-1349-ba9b5babae0b
     name-label ( RW): Ubuntu Precise Pangolin 12.04 (64-bit) (1)
    power-state ( RO): running

As we already know, the VM I want to "fix" in my case is the Ubuntu Precise Pangolin 12.04 (64-bit) (2), with the uuid f5870ba2-c405-56a9-8022-41ca4fc362a1. On with the fix then:

[root@xenserver-aipuwzhh ~]# xe vm-param-set uuid=f5870ba2-c405-56a9-8022-41ca4fc362a1 HVM-boot-policy=BIOS\ order HVM-boot-params:order=dc

Drumroll please...


Great stuff.

Friday, November 14, 2014

Free Hypervisors Comparison

I often read debates and opinions on the internet concerning the pros and cons of the free versions of the three most widely-spread hypervisors.

Here's my view on them:


ESXi:


Pros:

  • It's the most popular bare-metal hypervisor, so whatever problem you encounter you can just google for the answer.  
  • Supports a huge number of Guest OSes 

Cons:

  • It's not free; this is not even a clever marketing technique. It's a bait and switch, plain and simple. Let me elaborate here. ESXi is free, which is the hypervisor part. Great. But its management tools aren't. So you can't do absolutely anything with it. If you want to actually install a guest OS, you'll need the vSphere client which costs thousands of dollars, or VMware workstation that you will need to use to connect to the ESXi remotely (a solution which will set you back a few hundred dollars instead). 
  • I have found its command line to be obtuse. I know, eye of the beholder and all, but it would be much easier to learn if it had completion for its commands as well as the command parameters, just like XenServer.


Hyper-V:


Pros:

  • If you're planning to install a Windows OS, look no further. Microsoft has done a great job with the optimization and performance of Windows-based VMs. 
 
Cons:

  • Even though it is dead simple to actually install the hypervisor you can't do anything unless you have set up and configured users, domains, firewall rules, etc. from the command line. If you're not already familiar with PowerShell, this can be a daunting and time consuming task (actually, it is a time-consuming task even if you are familiar with the PowerShell). Luckily, there is a script out there that takes care of most of these tasks, reducing the time taken to actually set up everything. After that, you'll need to install the RSAT tools and Hyper-V tools on your PC. Finally, if you're running windows 8, for some strange reason, Microsoft has also decided that you will need the Pro Edition to manage your Hyper-V server.
  • It does not provide zero-downtime live VM migration  
  • Dynamic Memory is only supported with VMs running Windows Vista SP1 and above, or Windows Server 2008 SP2/2008R2 SP1, 2003 R2 SP2 and 2003 SP2.
  • If you're planning to use Linux, you'll need to install the legacy network adapters, and after you're done with the installation of the Linux Integration Services, you'll need to substitute the network adapters for better ones; somewhat minor irritation, I know. 


XenServer:


Pros:

  • It's a fully-fledged Operating System based on Red-Hat 5, which means you can tweak it and do whatever you want. For instance, you will need to have specialized software to take backups of your VMs if you're running Hyper-V or ESXi. You can if you want with XenServer, but personally I've just written a perl script. And it works great. And guess what, too: my backups are written to a GlusterFS volume. If I had ESXi, I would have to use the insecure and deprecated NFS protocol for that. On XenServer, I just had to install GlusterFS, like any other Linux node.
  • Its command line is unbelievably good. And extremely easy to learn. You can do everything with it.
  • The free version is not a watered-down version of the paid one. Almost anything you can do with the XenServer paid version you can with the XenServer free version, except features like GPU virtualization, in-memory read caching, support and patching (you'll have to patch using the command line if you're using the free version).

Cons:

  • XenServer used to have a great networking management interface called the Distributed Virtual Switch Controller. Unfortunately, this tool became deprecated as soon as the product was decided to become open-source. Of course, since XenServer is a fully-fledged Linux distro, this means that it is trivial to actually solve any network-related issue by switching our networking stack to Linux bridge, and taking it from there. 

Saturday, January 25, 2014

XenServer General Backend Error while trying to detach an NFS Storage Repository

Ever had this error? Really annoying, and you're stuck basically until the NFS server comes up (if you're lucky).

It's more or less practice for some people (like me) to have their O/S images uploaded to and made available from an EC2 instance so that whenever a new VM is about to be installed, that instance can be turned on and accessed by XenServer as an NFS ISO Library.


Here's the catch though: EC2 instances have dynamic IPs, so if you forget to detach the SR from XenServer before you shut the instance down it becomes inaccessible and therefore XenServer can't detach it gracefully.


Of course that is not the only case where this error can occur. If your NFS server bites the dust, you're stuck with a Storage Repository that just won't die. The workaround is pretty straightforward though.

- SSH to your XenServer
- Find out the UUID of your NFS Storage (xe sr-list name-label=YOUR_NFS_SR_NAME)
- Find out the SR-UUID of the corresponding Physical Block Device (xe pbd-list sr-uuid=YOUR_NFS_STORAGE_UUID)
- Find out the location of the filesystem where the zombie NFS export is mounted on
- Unmount it using the "force" and "lazy" parameters
- Order XenServer to unplug the Physical Block Device through the command line (xe pbd-unplug uuid=UUID_OF_THE_PBD --although now this should be possible from the GUI as well)
- Order XenServer to forget the device altogether (xe sr-forget uuid=YOUR_NFS_STORAGE_UUID --although now this should be possible from the GUI as well)

For our purposes, our XenServer's IP address is 172.16.1.10, the remote NFS share is located at 54.217.159.179:/export and our NFS SR was named "NFS ISO library".

root@linux:~# ssh -C 172.16.1.10   
[root@xenserver ~]# xe sr-list name-label="NFS ISO library" 
uuid ( RO)                : 6e0b7373-a1a3-1edb-1a09-b72a2bebbc7d
          name-label ( RW): NFS ISO library
    name-description ( RW): NFS ISO Library [54.217.159.179:/export]
                host ( RO): xenserver
                type ( RO): iso
        content-type ( RO): iso


[root@xenserver ~]# xe pbd-list sr-uuid=6e0b7373-a1a3-1edb-1a09-b72a2bebbc7d
uuid ( RO)                  : accefe2d-8a22-d87d-23c6-53ab3110fc6b
             host-uuid ( RO): 66807c1f-39c3-418f-8d91-301380a05805
               sr-uuid ( RO): 6e0b7373-a1a3-1edb-1a09-b72a2bebbc7d
         device-config (MRO): type: nfs_iso; location: 54.217.159.179:/export
    currently-attached ( RO): true

[root@xenserver ~]# cat /etc/mtab
/dev/md0 / ext3 rw 0 0
none /proc proc rw 0 0
none /sys sysfs rw 0 0
none /dev/pts devpts rw 0 0
none /dev/shm tmpfs rw 0 0
/opt/xensource/packages/iso/XenCenter.iso /var/xen/xc-install iso9660 \
    ro,loop=/dev/loop0 0 0
none /proc/sys/fs/binfmt_misc binfmt_misc rw 0 0
sunrpc /var/lib/nfs/rpc_pipefs rpc_pipefs rw 0 0
54.217.159.179:/export /var/run/sr-mount/6e0b7373-a1a3-1edb-1a09-b72a2bebbc7d \
    nfs rw,soft,timeo=133,retrans=2147483647,tcp,actimeo=0,addr=54.217.159.179 0 0

[root@xenserver ~]# umount -f -l /var/run/sr-mount/6e0b7373-a1a3-1edb-1a09-b72a2bebbc7d
[root@xenserver ~]# xe pbd-unplug uuid=accefe2d-8a22-d87d-23c6-53ab3110fc6b
[root@xenserver ~]# xe sr-forget uuid=6e0b7373-a1a3-1edb-1a09-b72a2bebbc7d