Showing posts with label XenServer. Show all posts

Friday, February 6, 2015

Install pfSense on XenServer Part 2

The process is going to take a while, so sit back until you see your pfSense VM available.


And of course the first thing we're going to do is add the NIC that we weren't allowed to when importing.


Time to boot up our pfSense. Once booted, it will notify that the previous NICs do not exist, but new ones do. Make sure you assign the correct ones, checking your MAC addresses from XenCenter's "Networking" Tab:


And that should be all there is to it. There's a chance a hard disk or NIC device changes its name after an update, but nothing we can't handle.


Install pfSense on XenServer Part 1

In this post I'll walk through the steps required to install pfSense (and pretty much any other OS for that matter) on XenServer. And this is because we're going to cheat. That's right.

It's really easy in principle: Install Oracle VirtualBox on your PC, create your virtual machine there and import it. Done. If you feel confident enough, go ahead and do it yourself but I'm going to actually go through it, as it has 1 or 2 things that if you don't get right, you might end up with problems.

On with it then:

Step 1: Install pfSense on a VirtualBox VM:


While creating the VM, the important part is making sure your hard drive file type is importable by XenServer. Select VMDK and you can't go wrong.


Add the same number of NICs that your VM in your XenServer will have. This step is not as important as the others, but that's how I do it. In this case, I only have WAN/LAN interfaces so I only need two.


Don't forget to add a pfSense ISO in the CDROM of your VM


After that, boot it up and follow the install screen. After the pfSense installation is finished, go ahead and configure your IPs as they would appear in your XenServer VM.


Here's another important detail: Go to the pfSense's shell and type:

/usr/local/sbin/ufslabels.sh

This command converts /etc/fstab entries to UFS labels rather than disk device names. This is useful because in case of an upgrade, the disk device names might change and you might get stuck with an unbootable pfSense until you try and resolve the issue.


We're done with VirtualBox so halt the system. it's time to import it to XenServer.


The process is rather easy, but it's included here for completess' sake:


At this point, you will only have only one network as an option to add. No worries, we'll just select one of the correct NICs and add the second one later.


Don't worry about OS fixups. Just continue.


This is getting graphics heavy, so I'm going to make this a 2-part post.

Wednesday, February 4, 2015

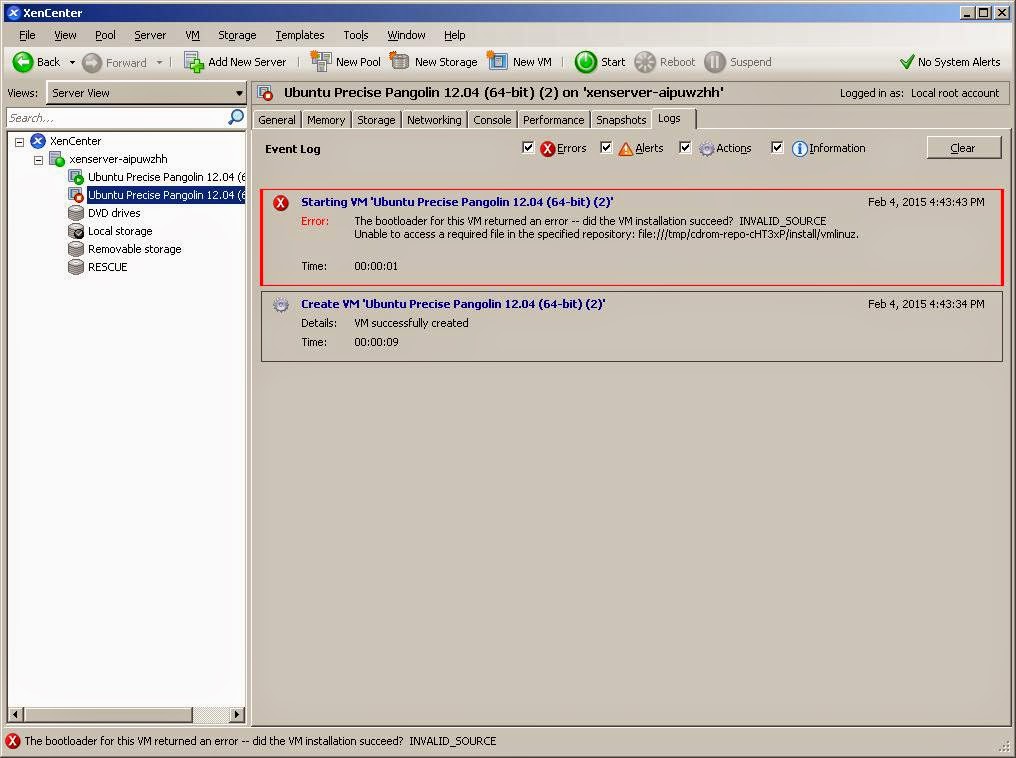
XenServer The bootloader for this VM returned an error Unable to access a required file in the specified repository: file:///tmp/cdrom-repo


Lovely, yes? It reads: Error: Starting VM 'Ubuntu Precise Pangolin 12.04 (64-bit) (2)' - The bootloader for this VM returned an error -- did the VM installation succeed?  INVALID_SOURCE
Unable to access a required file in the specified repository: file:///tmp/cdrom-repo-cHT3xP/install/vmlinuz.

What this means in simple terms is that the Virtual Machine is not configured to boot from an ISO.

[root@xenserver-aipuwzhh ~]# xe vm-list 
uuid ( RO)           : f5870ba2-c405-56a9-8022-41ca4fc362a1
     name-label ( RW): Ubuntu Precise Pangolin 12.04 (64-bit) (2)
    power-state ( RO): halted


uuid ( RO)           : 77c6963c-fb55-48e2-a799-82ea166d0748
     name-label ( RW): Control domain on host: xenserver-aipuwzhh
    power-state ( RO): running


uuid ( RO)           : 89ddbb9d-4c9e-16c6-1349-ba9b5babae0b
     name-label ( RW): Ubuntu Precise Pangolin 12.04 (64-bit) (1)
    power-state ( RO): running

As we already know, the VM I want to "fix" in my case is the Ubuntu Precise Pangolin 12.04 (64-bit) (2), with the uuid f5870ba2-c405-56a9-8022-41ca4fc362a1. On with the fix then:

[root@xenserver-aipuwzhh ~]# xe vm-param-set uuid=f5870ba2-c405-56a9-8022-41ca4fc362a1 HVM-boot-policy=BIOS\ order HVM-boot-params:order=dc

Drumroll please...


Great stuff.

Friday, November 14, 2014

Free Hypervisors Comparison

I often read debates and opinions on the internet concerning the pros and cons of the free versions of the three most widely-spread hypervisors.

Here's my view on them:


ESXi:


Pros:

  • It's the most popular bare-metal hypervisor, so whatever problem you encounter you can just google for the answer.  
  • Supports a huge number of Guest OSes 

Cons:

  • It's not free; this is not even a clever marketing technique. It's a bait and switch, plain and simple. Let me elaborate here. ESXi is free, which is the hypervisor part. Great. But its management tools aren't. So you can't do absolutely anything with it. If you want to actually install a guest OS, you'll need the vSphere client which costs thousands of dollars, or VMware workstation that you will need to use to connect to the ESXi remotely (a solution which will set you back a few hundred dollars instead). 
  • I have found its command line to be obtuse. I know, eye of the beholder and all, but it would be much easier to learn if it had completion for its commands as well as the command parameters, just like XenServer.


Hyper-V:


Pros:

  • If you're planning to install a Windows OS, look no further. Microsoft has done a great job with the optimization and performance of Windows-based VMs. 
 
Cons:

  • Even though it is dead simple to actually install the hypervisor you can't do anything unless you have set up and configured users, domains, firewall rules, etc. from the command line. If you're not already familiar with PowerShell, this can be a daunting and time consuming task (actually, it is a time-consuming task even if you are familiar with the PowerShell). Luckily, there is a script out there that takes care of most of these tasks, reducing the time taken to actually set up everything. After that, you'll need to install the RSAT tools and Hyper-V tools on your PC. Finally, if you're running windows 8, for some strange reason, Microsoft has also decided that you will need the Pro Edition to manage your Hyper-V server.
  • It does not provide zero-downtime live VM migration  
  • Dynamic Memory is only supported with VMs running Windows Vista SP1 and above, or Windows Server 2008 SP2/2008R2 SP1, 2003 R2 SP2 and 2003 SP2.
  • If you're planning to use Linux, you'll need to install the legacy network adapters, and after you're done with the installation of the Linux Integration Services, you'll need to substitute the network adapters for better ones; somewhat minor irritation, I know. 


XenServer:


Pros:

  • It's a fully-fledged Operating System based on Red-Hat 5, which means you can tweak it and do whatever you want. For instance, you will need to have specialized software to take backups of your VMs if you're running Hyper-V or ESXi. You can if you want with XenServer, but personally I've just written a perl script. And it works great. And guess what, too: my backups are written to a GlusterFS volume. If I had ESXi, I would have to use the insecure and deprecated NFS protocol for that. On XenServer, I just had to install GlusterFS, like any other Linux node.
  • Its command line is unbelievably good. And extremely easy to learn. You can do everything with it.
  • The free version is not a watered-down version of the paid one. Almost anything you can do with the XenServer paid version you can with the XenServer free version, except features like GPU virtualization, in-memory read caching, support and patching (you'll have to patch using the command line if you're using the free version).

Cons:

  • XenServer used to have a great networking management interface called the Distributed Virtual Switch Controller. Unfortunately, this tool became deprecated as soon as the product was decided to become open-source. Of course, since XenServer is a fully-fledged Linux distro, this means that it is trivial to actually solve any network-related issue by switching our networking stack to Linux bridge, and taking it from there. 

Monday, June 23, 2014

XenServer 6.2 Unable to find partition containing kernel

Sometimes XenServer can be a real pain in the neck.

Here's what I ran into a little earlier:

I upgrade my VM's kernel and reboot. Wait for a while, but the VM doesn't appear to come up. So I go to my Logs and lo and behold:


Ugh, wat?

OK, let's see if we can start it manually, worst case scenario is the command line providing us with more info, right?

[root@xen]# xe vm-start vm="My VM's Name"
The bootloader returned an error
vm: .... (My VM's Name)
msg: Unable to find partition containing kernel

Oh, how informative. Luckily XenServer provides us with an off-line VM boot editor. That should do the trick:

[root@xen]# xe-edit-bootloader -n "My VM's Name" -p 1
Plugging VBD: 
Creating dom0 VBD: ...
add map ...1 (252:5): 0 1048576 linear /dev/sm/backend/.../... 2048
add map ...2 (252:6): 0 33554432 linear /dev/sm/backend/.../... 1050624
add map ...3 (252:7): 0 1886386176 linear /dev/sm/backend/.../... 34605056
Waiting for /dev/mapper/...1: .....Device /dev/mapper/...1 not found.
You must specify the correct partition number with -p
Unplugging VBD: . done

This should have worked. It's usually as good as logging into the VM and editing the GRUB menu.lst yourself. What on earth happened here? Well, I'm pretty sure I know my systems and my partitions so I'm sure the /boot partition is the first one!

What now? Well, for sure we'll need to boot from a rescue disk. So, make sure your NFS ISO library is online or you have a storage already handy that has a rescue CD .iso. No? We don't? Well, no reason to panic. We'll just create a directory named "/rescue/ISOs", download a Debian Live CD there and create an SR with the name label "RESCUE" that points to that directory:

[root@xen]# mkdir -p /rescue/ISOs
[root@xen]# cd /rescue/ISOs
[root@xen]# wget http://cdimage.debian.org/debian-cd/current-live/amd64/iso-hybrid/debian-live-7.5.0-amd64-rescue.iso
[root@xen]# xe sr-create name-label=RESCUE type=iso device-config:legacy_mode=true device-config:location=/rescue/ISOs content-type=iso
303bd588-c675-2bc0-8982-8a691141226a 

Please note that you need to make sure you create this SR on a partition with plenty of disk space, the Dom0's default partition is just too small and therefore I do not recommend having any rescue ISOs on it.

Cool. Now let's select that ISO as our DVD disk on our VM and finally boot off of it. The latter task can be done by going to VM -> Start/Shut Down -> Start in Recovery Mode.

Now that everything's started up, let's see what's going on. As I already mentioned, my /boot partition is my first partition so let's mount it and inspect the grub.conf file:

root@debian:~# cat /proc/partitions
major minor  #blocks  name

 202        0  960495616 xvda
 202        1     524288 xvda1
 202        2   16777216 xvda2
 202        3  943193088 xvda3
  11        0     696320 sr0
   7        0     548992 loop0 
root@debian:~# mkdir /a
root@debian:~# mount /dev/xvda1 /a
root@debian:~# vi /a/grub/grub.conf 
# grub.conf generated by anaconda
#
# Note that you do not have to rerun grub after making changes to this file
# NOTICE:  You have a /boot partition.  This means that
#          all kernel and initrd paths are relative to /boot/, eg.
#          root (hd0,0)
#          kernel /vmlinuz-version ro root=/dev/xvda3
#          initrd /initrd-[generic-]version.img
#boot=/dev/xvda
default=1
timeout=5
splashimage=(hd0,0)/grub/splash.xpm.gz
hiddenmenu
title Oracle Linux Server (3.8.13-35.1.2.el6uek.x86_64)
        root (hd0,0)
        kernel /vmlinuz-3.8.13-35.1.2.el6uek.x86_64 ro root=UUID=e9b3edd9-15e0-4cfd-a8fa-7dc24f6aeefa rd_NO_LUKS LANG=en_US.UTF-8 rd_NO_MD console=hvc0  KEYTABLE=us SYSFONT=latarcyrheb-sun16  rd_NO_LVM rd_NO_DM rhgb quiet
        initrd /initramfs-3.8.13-35.1.2.el6uek.x86_64.img

Now, we have two options really:

a) Solving this through XenServer. We would have to issue:

xe vm-param-set uuid=vm-uuid PV-bootloader-args="--kernel=/vmlinuz-3.8.13-35.1.2.el6uek.x86_64 --ramdisk=/initramfs-3.8.13-35.1.2.el6uek.x86_64.img"
xe vm-param-set uuid=vm-uuid PV-args="root=root-device  ro quiet"

Since I would have to change this every time I upgrade the kernel and I really want to find what went wrong, I'll pass this option for now.

b) Trying to debug what's wrong with grub.conf.

Since the kernel is too recent to not support XenServer, it should just be a matter of patience to debug it.

Here's what's usually wrong with grub.conf/menu.lst:
i  ) The root(hdx,y) is wrong:
          x should point to the hard drive number where our boot partition is located at;
          y should point to the partition number of our boot partition.
   In this case, root(hd0,0) is correct.
ii ) The paths of vmlinuz-... and/or initramfs-... are wrong.
         The paths should be relative to the partition root directory. So for example if the boot directory is in a dedicated partition, it should be /vmlinuz-... and /initramfs-... but if the boot directory is in the same partition as the linux root (/) directory it should be /boot/vmlinuz-... and /boot/initramfs... if that explanation makes sense.
iii) The root directive is wrong.
          Here I mean the root directive that defines the linux root (/) directory, and not the boot partition which has been already declared with the root(hdx,y) statement. It could be root=/dev/xvda3 for instance. In my case it is root=UUID=e9b3edd9-15e0-4cfd-a8fa-7dc24f6aeefa.

The three cases above can be easily examined with a simple ls command on the /a directory and a blkid /dev/xvda3 or ls -l /dev/disk/by-uuid to find if the UUID of the device that hosts our root (/) directory is the correct one.

Another case is for the partition to have been corrupted, so we just umount /a and fsck /dev/xvda1    

In my case, as you can see the error was in the default setting. Changing this to 0 did the trick. Default signifies which item in the menu is the one that will boot after the user-interaction timeout occurs. The count starts from 0 and not from 1 so my system couldn't boot. What happened is that the OS provider had decided to change the default kernel order, making a mess out of my server.

Save changes, shutdown, reboot. Should be fine.

Friday, February 21, 2014

Monitor your HP Smart Array RAID controller from XenServer 6.2

I have a few HP Proliant Servers that I use as XenServer hosts. The problem is that I want to know the health of my disks and my RAID arrays, and of course I can't get those from the XenServer guests.

So here's what we do:

Just google for knowledge base search hp support center (HP changes their links too often for me to give you the current link, it will probably change in a few months), follow that link and then choose "Search HP Support Center" in Knowledge Base.

When you're there search for HP Array Configuration Utility CLI for Linux and select the most recent 32-bit version (XenServer Dom0 is 32-bit).

Get its URL and download it from your XenServer or download it to your PC and sftp it to your Xenserver. The most recent version at the time of writing was this:

http://ftp.hp.com/pub/softlib2/software1/pubsw-linux/p414707558/v71530/hpacucli-9.10-22.0.i386.rpm

Time for the fun part. Let's log into our XenServer:

[root@server ~]# wget http://ftp.hp.com/pub/softlib2/software1/pubsw-linux/p414707558/v71530/hpacucli-9.10-22.0.i386.rpm


From the README.txt:

Description
-----------

  The Array Configuration Utility CLI is a commandline-based disk
   configuration program for Smart Array Controllers and
   RAID Array Controllers.
 
* All other product names mentioned herein may be trademarks of their
  respective companies.

Supported Controllers

  Smart Array products:
     Smart Array 5312 Controller
     Smart Array 5302 Controller
     Smart Array 5304 Controller
     Smart Array 532 Controller
     Smart Array 5i Controller 
     Smart Array 641 Controller
     Smart Array 642 Controller
     Smart Array 6400 Controller
     Smart Array 6400 EM Controller
     Smart Array 6i Controller
     Smart Array P600 Controller
     Smart Array P400 Controller
     Smart Array P400i Controller
     Smart Array E200 Controller
     Smart Array E200i Controller
     Smart Array P800 Controller
     Smart Array E500 Controller
     Smart Array P700m Controller
     Smart Array P410i Controller
     Smart Array P411 Controller
     Smart Array P212 Controller
     Smart Array P712m Controller
     Smart Array B110i SATA RAID
     Smart Array P812 Controller
     Smart Array P220i Controller
     Smart Array P222 Controller
     Smart Array P420 Controller
     Smart Array P420i Controller
     Smart Array P421 Controller
     Smart Array P822 Controller
     Dynamic Smart Array B320i RAID
     Dynamic Smart Array B120i RAID

  MSA products:
     MSA500 Controller
     MSA500 G2 Controller
     MSA1000 Controller    
     MSA1500 CS Controller
     MSA20 Controller  

[root@server ~]# yum install -y --nogpgcheck hpacucli-9.10-22.0.i386.rpm
[root@server ~]# hpacucli controller slot=1 physicaldrive all show
Smart Array P410 in Slot 1

   array A

      physicaldrive 1I:1:1 (port 1I:box 1:bay 1, SATA, 1 TB, OK)
      physicaldrive 1I:1:2 (port 1I:box 1:bay 2, SATA, 1 TB, OK)

   array B

      physicaldrive 1I:1:3 (port 1I:box 1:bay 3, SATA, 1 TB, OK)
      physicaldrive 1I:1:4 (port 1I:box 1:bay 4, SATA, 1 TB, OK)

   array C

      physicaldrive 1I:1:5 (port 1I:box 1:bay 5, SATA, 1 TB, OK)
      physicaldrive 1I:1:6 (port 1I:box 1:bay 6, SATA, 1 TB, OK)

   array D

      physicaldrive 1I:1:7 (port 1I:box 1:bay 7, SATA, 1 TB, OK)
      physicaldrive 1I:1:8 (port 1I:box 1:bay 8, SATA, 1 TB, OK)

   array E

      physicaldrive 1I:1:9 (port 1I:box 1:bay 9, SATA, 1 TB, OK)
      physicaldrive 1I:1:10 (port 1I:box 1:bay 10, SATA, 1 TB, OK)

And a few helpful commands:
[root@server ~]# hpacucli help
CLI Syntax
   A typical ACU CLI command line consists of three parts: a target device, 
   a command, and a parameter with values if necessary. Using angle brackets to
   denote a required variable and plain brackets to denote an optional 
   variable, the structure of a typical ACU CLI command line is as follows:

      <target> <command> [parameter=value]

   <target> is of format:
      [controller all|slot=#|wwn=#|chassisname="AAA"|
                  serialnumber=#|chassisserialnumber=#|ctrlpath=#:# ]
      [array all|<id>]
      [physicaldrive all|allunassigned|[#:]#:#|[#:]#:#-[#:]#:#]
      [ssdphysicaldrive all|allunassigned|[#:]#:#|[#:]#:#-[#:]#:#]
      [logicaldrive all|#]
      [enclosure all|#:#|serialnumber=#|chassisname=#]
      [licensekey all|<key>]
      [ssdinfo]
      Note 1: The #:#:# syntax is only needed for systems that
              specify port:box:bay. Other physical drive targeting
              schemes are box:bay and port:id.
      Note 2: The chassisserialnumber is known in ACU as the
              RAID Array Serial Number. The chassisname is known
              in ACU as the RAID Array ID.
      Note 3: ctrlpath=#:# maps to "smart enclosure hooked up to 
              host bus adapter slot:host bus adapter port"

   Example targets:
      controller slot=5
      controller chassisname="Lab C"
      controller serialnumber=P21DA2322S
      controller chassisserialnumber=9J3CJN71XDCH
      controller wwn=500308B300701011
      controller slot=7 array A
      controller slot=5 logicaldrive 5
      controller slot=5 physicaldrive 1:5
      controller slot=5 physicaldrive 1E:2:3
      controller slot=5 ssdphysicaldrive all
      controller slot=5 enclosure 4E:1 show
      controller slot=5 licensekey XXXXX-XXXXX-XXXXX-XXXXX-XXXXX

For detailed command information type any of the following: 
   help add
   help create
   help delete
   help diag
   help modify
   help remove
   help shorthand
   help show
   help target
   help rescan
   help version

Help also accepts commonly used CLI parameters and ACU keywords. Adding
additional keywords will further filter the help output. Examples: 
   help ssp        (shows all ssp help including show and modify commands)
   help ssp modify (restricts ssp help to only modify commands)
   help migrate
   help expand   
   help extend   
   help <keyword> <keyword> ... <keyword>

   Please note that beginning with ACU/ACUCLI version 8.55, the term 
   "stripe size" has been replaced by "strip size."  This is a change
   of labeling and does not signify a change in functionality.  When 
   distributing data across multiple physical drives (striping) the
   "strip size" is the amount of data that is written to each physical
   drive.  The "full stripe size" refers to the combined size of all
   the strips across all physical drives,  excluding parity-only drives.

Done!

Saturday, January 25, 2014

XenServer General Backend Error while trying to detach an NFS Storage Repository

Ever had this error? Really annoying, and you're stuck basically until the NFS server comes up (if you're lucky).

It's more or less practice for some people (like me) to have their O/S images uploaded to and made available from an EC2 instance so that whenever a new VM is about to be installed, that instance can be turned on and accessed by XenServer as an NFS ISO Library.


Here's the catch though: EC2 instances have dynamic IPs, so if you forget to detach the SR from XenServer before you shut the instance down it becomes inaccessible and therefore XenServer can't detach it gracefully.


Of course that is not the only case where this error can occur. If your NFS server bites the dust, you're stuck with a Storage Repository that just won't die. The workaround is pretty straightforward though.

- SSH to your XenServer
- Find out the UUID of your NFS Storage (xe sr-list name-label=YOUR_NFS_SR_NAME)
- Find out the SR-UUID of the corresponding Physical Block Device (xe pbd-list sr-uuid=YOUR_NFS_STORAGE_UUID)
- Find out the location of the filesystem where the zombie NFS export is mounted on
- Unmount it using the "force" and "lazy" parameters
- Order XenServer to unplug the Physical Block Device through the command line (xe pbd-unplug uuid=UUID_OF_THE_PBD --although now this should be possible from the GUI as well)
- Order XenServer to forget the device altogether (xe sr-forget uuid=YOUR_NFS_STORAGE_UUID --although now this should be possible from the GUI as well)

For our purposes, our XenServer's IP address is 172.16.1.10, the remote NFS share is located at 54.217.159.179:/export and our NFS SR was named "NFS ISO library".

root@linux:~# ssh -C 172.16.1.10   
[root@xenserver ~]# xe sr-list name-label="NFS ISO library" 
uuid ( RO)                : 6e0b7373-a1a3-1edb-1a09-b72a2bebbc7d
          name-label ( RW): NFS ISO library
    name-description ( RW): NFS ISO Library [54.217.159.179:/export]
                host ( RO): xenserver
                type ( RO): iso
        content-type ( RO): iso


[root@xenserver ~]# xe pbd-list sr-uuid=6e0b7373-a1a3-1edb-1a09-b72a2bebbc7d
uuid ( RO)                  : accefe2d-8a22-d87d-23c6-53ab3110fc6b
             host-uuid ( RO): 66807c1f-39c3-418f-8d91-301380a05805
               sr-uuid ( RO): 6e0b7373-a1a3-1edb-1a09-b72a2bebbc7d
         device-config (MRO): type: nfs_iso; location: 54.217.159.179:/export
    currently-attached ( RO): true

[root@xenserver ~]# cat /etc/mtab
/dev/md0 / ext3 rw 0 0
none /proc proc rw 0 0
none /sys sysfs rw 0 0
none /dev/pts devpts rw 0 0
none /dev/shm tmpfs rw 0 0
/opt/xensource/packages/iso/XenCenter.iso /var/xen/xc-install iso9660 \
    ro,loop=/dev/loop0 0 0
none /proc/sys/fs/binfmt_misc binfmt_misc rw 0 0
sunrpc /var/lib/nfs/rpc_pipefs rpc_pipefs rw 0 0
54.217.159.179:/export /var/run/sr-mount/6e0b7373-a1a3-1edb-1a09-b72a2bebbc7d \
    nfs rw,soft,timeo=133,retrans=2147483647,tcp,actimeo=0,addr=54.217.159.179 0 0

[root@xenserver ~]# umount -f -l /var/run/sr-mount/6e0b7373-a1a3-1edb-1a09-b72a2bebbc7d
[root@xenserver ~]# xe pbd-unplug uuid=accefe2d-8a22-d87d-23c6-53ab3110fc6b
[root@xenserver ~]# xe sr-forget uuid=6e0b7373-a1a3-1edb-1a09-b72a2bebbc7d